SEVOsmith v2.2.0 n8n Setup Guide: Full Configuration Walkthrough
Don’t have SEVOsmith v2.2.0 yet?
For a high-level look at the system, see our SEVOsmith product overview.
Get all 6 workflows + Google Sheets template + full documentation. One-time purchase, instant delivery.
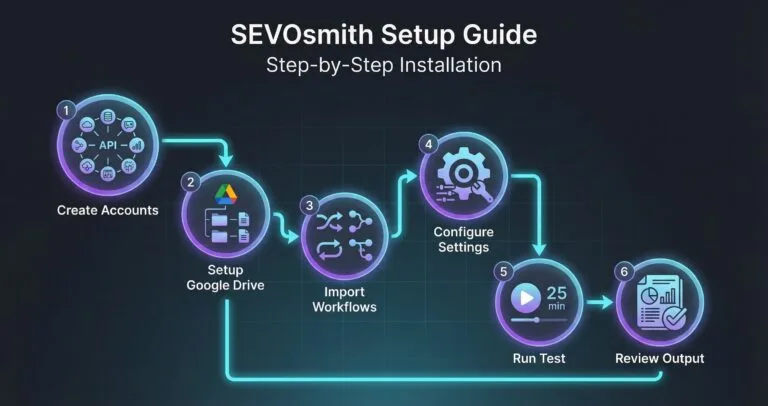
This is the complete setup guide for SEVOsmith v2.2.0 — a 6-workflow, 12-agent content production system built on n8n. New to SEVOsmith? Read the feature overview first to understand what the system does before configuring it. Whether you’re setting up for the first time or upgrading from v1.5.0, follow each section in order. Skipping steps will cause credential failures that are tedious to debug later.
Before You Start — What You Need
| Requirement | Details | Where to Get It |
|---|---|---|
| n8n instance | Cloud Starter plan or self-hosted (Enterprise for DataTables). Community edition does not support DataTables — required for WordPress & Shopify publishing. | n8n.io/pricing |
| 9 API accounts | DataForSEO, Google Cloud, Gemini, OpenRouter, Perplexity, Firecrawl, WordPress, Cloudflare R2, Anthropic | Part 1 of this guide |
| Starter budget | ~0–30 across all API services to complete setup + run 3 test articles | See cost breakdown in Part 1 |
| Time | ~3 hours for first-time setup. Upgrading from v1.5.0? Expect ~90 min (credential re-use speeds things up). | — |
| SEVOsmith package | 6 workflow JSON files + Content Planner spreadsheet template | From your Gumroad purchase email |
Contents
- The Six Core Workflows — What They Are and How They Connect
- Part 1: Required API Accounts
- Part 2: Google Drive & Sheets Setup
- Part 3: Import the Six Core Workflows
- Part 4: Configure the KW Research Engine v2.2.0
- Step 4.1: Config Node — No Changes Needed
- Step 4.2: Connect DataForSEO Credentials
- Step 4.3: Connect Google Sheets Credential
- Step 4.4: Connect Google Drive Credential
- Step 4.5: Connect S3 / Cloudflare R2 Credential
- Step 4.6: Connect Gmail Credential
- Step 4.7: Set Up Project Settings in Your Sheet
- Before You Continue — Part 4 Checklist
- Part 5: Configure the Tools Sub-Workflow v2.2.0
- Part 6: Configure the Image Generator v2.2.0
- Part 7: Configure the WordPress Publisher v2.2.0
- Part 8: Configure the Shopify Publisher v2.2.0
- Part 9: Configure the Main Workflow — AI-Citable Content Engine v2.2.0
- Part 10: Complete Your Project Settings
- Part 11: First Test Runs
- Part 12: Reviewing Your Outputs
- Part 13: Adding Articles to the Queue
- Part 14: Troubleshooting
- Workflow stops at “Get Main Keyword” with no output
- Sub-workflow fails with “Workflow ID not found” or “Invalid workflow”
- DataForSEO nodes fail with 401 or 403 errors
- Google OAuth errors after a few weeks
- S3 nodes produce errors but the workflow continues
- WordPress Publisher fails — no draft created
- OpenRouter / Claude nodes fail
- Gemini nodes fail with 429 or 403 errors
- Anthropic / Claude direct API nodes fail
- Frequently Asked Questions
- A Note on Quality Expectations
- Skip the Setup — Let Us Do It For You
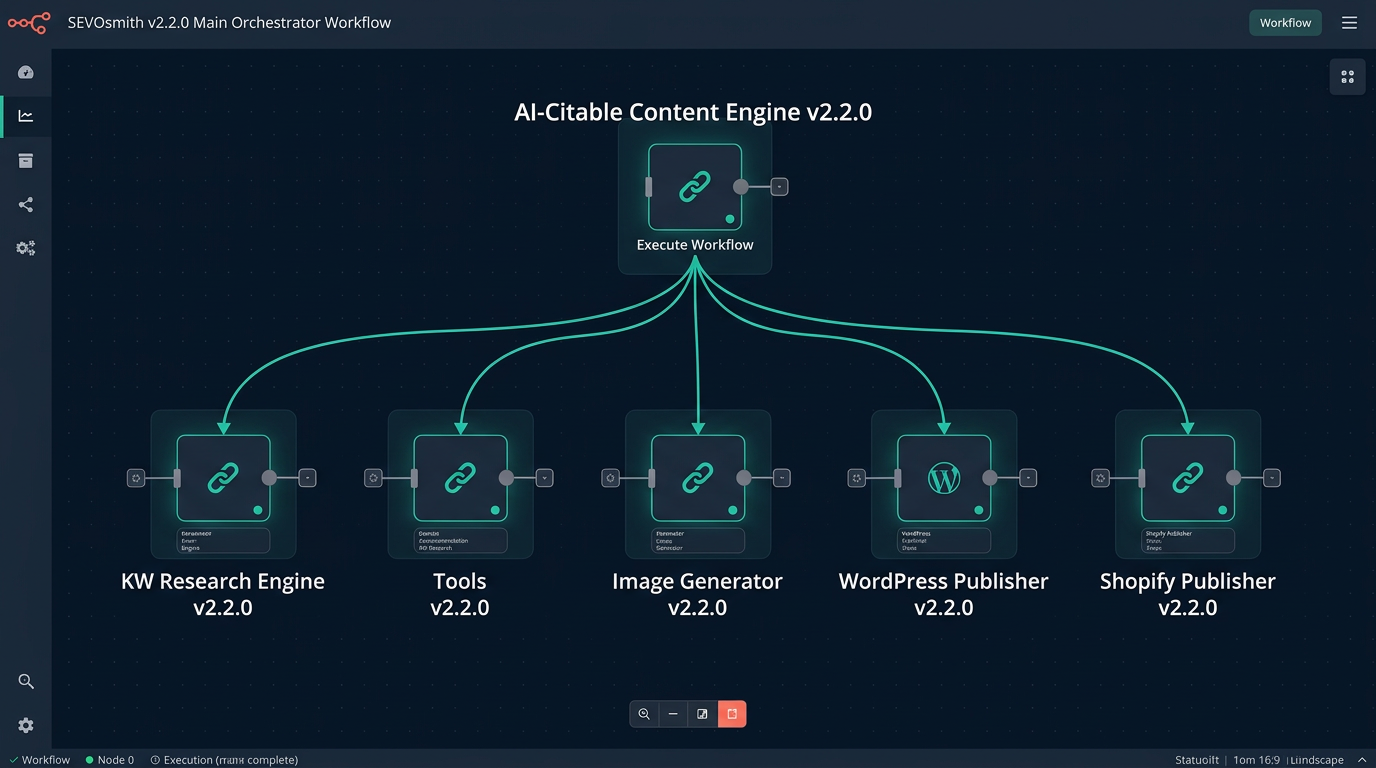
The Six Core Workflows — What They Are and How They Connect
| Workflow File | Role | Triggered By |
|---|---|---|
| SEVOsmith_Tools_v2.2.0.json | Sub-workflow: cache check, parse & store, run logging | Called by The AI-Citable Content Engine |
| SEVOsmith_Keyword_Research_Engine_v2.2.0.json | Sub-workflow: 10-endpoint keyword intelligence with S3 caching | Called by The AI-Citable Content Engine |
| SEVOsmith_Image_Generator_v2.2.0.json | Sub-workflow: AI image generation via Gemini Imagen + S3 upload | Called by The AI-Citable Content Engine |
| SEVOsmith_Publisher_WordPress_v2.2.0.json | Sub-workflow: publish articles to WordPress (DataTable auth) | Called by The AI-Citable Content Engine |
| SEVOsmith_Publisher_Shopify_v2.2.0.json | Sub-workflow: publish articles to Shopify blogs (DataTable auth) | Called by The AI-Citable Content Engine |
| SEVOsmith_v2.2.0_The AI-Citable Content Engine.json | Main orchestrator: reads Google Sheet → runs all agents → publishes article | Webhook or manual |
YOUR GOOGLE SHEET (Content Planner)
         │
         ▼
 AI-Citable Content Engine v2.2.0 (194 nodes)
    ├── calls ──▶  Tools v2.2.0           (cache, parse, store, log)
    ├── calls ──▶  KW Research Engine v2.2.0  (keyword intelligence)
    ├── calls ──▶  Image Generator v2.2.0     (Gemini Imagen)
    ├── calls ──▶  WordPress Publisher v2.2.0 (DataTable auth)
    └── calls ──▶  Shopify Publisher v2.2.0   (DataTable auth)
         │
         ▼
Published Article + ReportsPart 1: Required API Accounts
⏱️ Estimated time: ~60–90 min
⚠️ Set up every account before importing any workflow. You will need all 9 credentials ready during configuration.
Running v1.5? See the v1.5 setup guide instead.
1. DataForSEO
Used by: KW Research Engine (10 endpoints)
Cost: ~$0.10–$0.15 per keyword research run
- Go to dataforseo.com and create an account
- Add a payment method under Billing — you need at least $5 credit to start
- Go to Dashboard → API Access
- Copy your Login (your email address) and your Password (the DataForSEO API password, not your account login password)
- Keep both — you will use them to create an HTTP Basic Auth credential in n8n
2. Google Workspace (Sheets + Drive + Docs + Gmail)
Used by: Main orchestrator and KW Research Engine
Cost: Free (Google Cloud free tier is sufficient)
All four Google services use a single OAuth2 credential in n8n. You set it up once and it covers everything. See n8n’s official Google credentials documentation if you haven’t set this up before.
- Go to console.cloud.google.com and create a new project (e.g., “SEVOsmith”)
- Enable these 4 APIs: Google Sheets API, Google Drive API, Google Docs API, Gmail API
- Go to APIs & Services → Credentials → Create Credentials → OAuth 2.0 Client ID
- Application type: Web application
- Under Authorized redirect URIs, add your n8n callback URL. To find it: in n8n, go to Settings → OAuth — the callback URL is shown there as a read-only field. It follows the format:
https://your-n8n-domain/rest/oauth2-credential/callback. Copy the exact URL shown in your n8n settings and paste it here. - Download the JSON — save the Client ID and Client Secret
- In Google Cloud Console, go to OAuth consent screen and add your Google account email as a test user. If you skip this, you will see “Error 403: access_denied” when authenticating in n8n.
- This one Google Cloud OAuth app covers all 4 Google services. When you create credentials in n8n, you will make 4 separate credentials (Google Sheets OAuth2, Google Drive OAuth2, Google Docs OAuth2, Gmail OAuth2) — but all 4 use the same Client ID and Client Secret from this app.
⚠️ Common error — “Error 403: access_denied”: This means your Google account is not listed as a test user in the OAuth consent screen. Go back to Google Cloud Console → APIs & Services → OAuth consent screen → Test users → Add your email. Then retry connecting in n8n.
3. Google AI Studio (Gemini)
Used by: Main orchestrator (AI agents), KW Research Engine (report synthesizer), Image Generator (Imagen API)
Cost: ~$0.60–$1.20 per article for all Gemini calls
- Go to aistudio.google.com
- Click Get API Key → Create API Key in new project
- Copy the key (format:
AIza...) - Enable billing on the associated Google Cloud project — the free tier will hit limits quickly in production
4. OpenRouter
Used by: Main orchestrator only — Outline Architect agent and Metadata Architect agent both use Claude Sonnet via OpenRouter
Cost: ~$0.25–$0.50 per article
- Go to openrouter.ai and create an account
- Add credit under Credits — $10 is enough to test with 20+ articles
- Go to Keys → Create Key, give it a name (e.g., “SEVOsmith”)
- Copy the API key (format:
sk-or-...)
5. Perplexity AI
Used by: Main orchestrator — Competitor Intelligence Analyst agent uses sonar-pro for live web research
Cost: ~$0.05–$0.10 per article
- Go to perplexity.ai
- Log in → click your avatar → API
- Click Generate → New API Key
- Copy the key (format:
pplx-...)
In n8n, create a Perplexity API credential type (search “Perplexity” in the credential dropdown — it is a native n8n credential). Enter your API key in the API Key field.
6. Firecrawl
Used by: Main orchestrator — Internal Linking Analyst uses Firecrawl to scan your site’s sitemap and validate URLs
Cost: Free tier = 500 requests/month (sufficient for most setups)
- Go to firecrawl.dev and create an account
- Go to API Keys
- Click Create API Key and copy it
⚠️ HTTP Header Auth requires two separate credentials. The main workflow uses HTTP Header Auth for Firecrawl (web scraping). The Image Generator sub-workflow uses a separate HTTP Header Auth credential for the Gemini Imagen API. These are two different services with different API keys — create two separate HTTP Header Auth credentials in n8n and apply them to the correct nodes in each respective workflow.
7. WordPress Site
Used by: WordPress Publisher sub-workflow — handles post creation, image upload, and RankMath metadata
Required: WordPress 5.6+ with Application Passwords enabled
- Log in to your WordPress admin
- Go to Users → Your Profile
- Scroll down to Application Passwords
- Enter a name (e.g., “SEVOsmith”) and click Add New Application Password
- Copy the generated password immediately — it will not be shown again
- Note your WordPress URL (e.g.,
https://yoursite.com) and your WordPress username - Verify the REST API is accessible: visit
https://yoursite.com/wp-json/wp/v2/posts— you should see a JSON response
Need a step-by-step walkthrough? See WordPress Application Passwords: Complete n8n Setup Guide.
8. Cloud Storage — Cloudflare R2 (recommended) or AWS S3
Used by: Main orchestrator (stores audit reports, research reports, final article HTML), KW Research Engine (caches research results)
Cost: Cloudflare R2 free tier = 10GB storage + 1M reads/month — sufficient for hundreds of articles
- Go to dash.cloudflare.com and log in (or create an account)
- Click R2 Object Storage → Create Bucket
- Name your bucket (e.g.,
sevosmith) and choose a region - Go to R2 → Manage R2 API Tokens → Create API Token
- Set permissions: Object Read & Write, apply to your bucket
- Copy: Access Key ID, Secret Access Key, and your account endpoint URL (format:
https://[account-id].r2.cloudflarestorage.com) - On the bucket settings page, enable Public Access if you want public report links. Copy the public URL prefix (format:
https://pub-[hash].r2.dev)
For a full walkthrough with screenshots, see How to Get Cloudflare R2 Access Key for n8n.
9. Anthropic (Claude API)
Used by: Main orchestrator — 2 agents call Claude directly via the Anthropic API
Cost: ~$0.10–$0.20 per article
- Go to console.anthropic.com and create an account
- Go to API Keys → Create Key
- Copy the key (format:
sk-ant-...) - Add credit if needed — Anthropic requires a positive balance for API access
Before You Continue — Part 1 Checklist
- ✅ DataForSEO login email and API password saved
- ✅ Google Cloud OAuth app created — Client ID and Client Secret saved
- ✅ Gemini API key copied
- ✅ OpenRouter API key copied
- ✅ Perplexity API key copied
- ✅ Firecrawl API key copied
- ✅ WordPress application password generated and saved
- ✅ Cloudflare R2 access key, secret, and endpoint URL saved
- ✅ Anthropic API key copied
Part 2: Google Drive & Sheets Setup
⏱️ Estimated time: ~30–45 min
Step 1: Create Your Google Drive Folder Structure
Create these folders in Google Drive and note the folder ID for each. Get a folder ID by opening the folder and copying it from the URL:
https://drive.google.com/drive/folders/[FOLDER-ID-HERE]

📁 SEVOsmith/
├── 📁 Reports/          ← HTML research + audit reports uploaded here
└── 📁 Raw Data/ ← Raw keyword data files (if save_raw_data = Yes)Step 2: Copy the SEVOsmith Content Planner
- Open the Content Planner template link from your SEVOsmith package
- Click File → Make a copy and save it to your Google Drive
- Open the copy and note the Spreadsheet ID from the URL:
https://docs.google.com/spreadsheets/d/[SPREADSHEET-ID]/edit - Share the spreadsheet with the Google account you’ll use for OAuth (the one you’ll authenticate in n8n)
The Content Planner has 6 tabs.
| Tab | What It’s For | Who Uses It |
|---|---|---|
| Manager | Your article queue — add keywords here, set Action status, trigger runs via Run Now or Scheduled DateTime | You (add rows) + The AI-Citable Content Engine (updates status) |
| Project_Setting | One row per project. All project configuration lives here — location, language, storage, CMS, notifications. Configure this first. | You (one-time per project) |
| Article_Report | Auto-log of every produced article: draft URL, quality score, R2/Drive report links, word count, cost | The AI-Citable Content Engine (auto-written after each run) |
| KW_Research_Report | Log of every keyword research run: DataForSEO cost, status, report links | KW Research Engine (auto-written) |
| Cache_Settings | Per-agent cache override. To force any agent to always run fresh (bypass its cached result), find that agent’s row and set use_cache to No. |
You (adjust per agent as needed) |
| REF_Locations | Not active in v2.2.0 — planned for v3.0.0. For now, find your DataForSEO location and language codes at dataforseo.com/datasets/locations-and-languages | — |
Step 3: Configure the Project_Setting Tab
Open the Project_Setting tab and add one row for the website you’re producing content for. This is the configuration the main workflow reads before every article run. You can fill in every column now — the only field to leave blank until later is Writer Voice Tone Example (covered in Part 11, after you have a style guide doc). You can copy my template at that link.
Identity & Target
| Column | Example | Notes |
|---|---|---|
| Project | Nextgrowth | The project identifier. Must match exactly what you type in the Manager tab — case-sensitive. This links every article run to the right settings. |
| Client Name | Nextgrowth AI | Display name used in email notifications and report headers. |
| CMS Platform | WordPress | WordPress or Shopify. Determines which publisher sub-workflow is called. |
| Target Domain | https://nextgrowth.ai | Your site URL with protocol. Used by the Internal Linking Analyst to scan your existing pages. |
Location & Language
These control which SERP data DataForSEO returns. Get your location and language codes from dataforseo.com/datasets/locations-and-languages.
| Column | Example | Notes |
|---|---|---|
| Location Name | United States | Human-readable label — for your reference only. |
| Location Code | 2840 | DataForSEO numeric code. Common values: 2840 = USA, 2826 = UK, 2036 = Australia. |
| Language Name | English | Human-readable label — for your reference only. |
| Language Code | en | ISO 639-1 two-letter code passed to DataForSEO. |
Content & Publishing
| Column | Example | Notes |
|---|---|---|
| Publish Draft | Yes | Yes creates a CMS draft automatically. No skips publishing — useful for testing. |
| Auto Generate Featured Images | Yes | Yes calls the Image Generator sub-workflow to create a featured/hero image. |
| Auto Generate Images H2 | Yes | Yes generates one image per H2 section in the article. |
| Images Hosting | WordPress | WordPress uploads images to your WP media library. S3 stores them in Cloudflare R2 and embeds public URLs. |
Storage
| Column | Example | Notes |
|---|---|---|
| Google Drive Folder ID | [your Reports folder ID] | The folder ID from Step 1 above. HTML reports are uploaded here. |
| Upload G-Drive | Yes | Yes uploads HTML research and audit reports to Google Drive. |
| Upload Cloudflare R2 | Yes | Yes uploads reports to Cloudflare R2 for public URL access. |
| Cloudflare R2 Link | https://pub-xxx.r2.dev | Your R2 bucket public URL prefix (from Part 1, Section 8). |
| S3 Bucket Name | sevosmith | Your R2 bucket name — exact match, case-sensitive. |
| Save Raw Data | No | Yes saves raw DataForSEO API responses to Google Drive. Useful for debugging. Leave No unless you need it. |
Notifications
| Column | Example | Notes |
|---|---|---|
| Email Notify | Yes | Yes sends a completion email after each article run finishes. |
| Send To Email | you@email.com | The email address to receive completion notifications. |
Cache Settings
| Column | Example | Notes |
|---|---|---|
| KW_Force_Refresh | No | Yes bypasses the R2 cache and re-runs all DataForSEO calls even if cached data exists. Leave No for normal operation. |
| KW_Cache_TTL_Days | 30 | Days before cached keyword research expires. 30 is a good default. |
| Content_Cache_TTL_Days | 7 | Days before cached agent output (research analysis, blueprints) expires. |
Style Guide
| Column | Notes |
|---|---|
| Writer Voice Tone Example | URL of a Google Doc containing your brand voice and writing style examples. The Outline Architect reads this before every article. |
⚠️ The Project column is case-sensitive across the entire system. The value in Project_Setting, the value you type in the Manager tab, and the value in the WordPress_Credentials DataTable must all be identical. A single character difference causes the workflow to fail silently.
Step 4: Configure the Apps Script
The Content Planner template includes a pre-built Apps Script called SEVOsmith Scheduler. It gives you two ways to trigger article production directly from the sheet — without opening n8n:
- Run Now checkbox — tick it on any Manager row to trigger that keyword immediately. A confirmation dialog shows you the keyword details before firing.
- Scheduled DateTime — set a future date and time on any row with Action =
Planning. The script checks every 5 minutes and fires automatically when the time arrives.
Copy the SEVOsmith Scheduler script here (expand to see the code)
const WEBHOOK_URL = 'https://n8n-prod.nextgrowth.ai/webhook/sevosmith-run';
const SHEET_NAME = 'Manager';

// ─── INSTALLABLE ON-EDIT TRIGGER ────────────────────────────────────
// Fires when a user ticks a "Run Now" checkbox.
// ONLY this checkbox triggers the workflow — editing Action does nothing.
//
// Setup: Triggers UI → + Add Trigger
//   → Function: onSheetEdit, Event: From spreadsheet, On edit
//
function onSheetEdit(e) {
  const sheet = e.source.getActiveSheet();
  if (sheet.getName() !== SHEET_NAME) return;

  const headers = sheet.getRange(1, 1, 1, sheet.getLastColumn()).getValues()[0];
  const runNowCol = headers.indexOf('Run Now') + 1;
  if (runNowCol === 0) return;

  const col = e.range.getColumn();
  const row = e.range.getRow();

  // Only react to "Run Now" column checkboxes, not header row
  if (col !== runNowCol || row <= 1) return;

  // Only react to checkbox being checked (TRUE)
  if (e.value !== 'TRUE') return;

  // Uncheck the box immediately
  sheet.getRange(row, col).setValue(false);

  // Read row data for confirmation dialog
  const rowData = sheet.getRange(row, 1, 1, sheet.getLastColumn()).getValues()[0];
  const get = function(name) {
    var idx = headers.indexOf(name);
    return idx >= 0 ? (rowData[idx] || '—') : '—';
  };

  var keyword = get('Keyword');
  var project = get('Project');
  var action = get('Action');
  var wordCount = get('Word Count');
  var format = get('Content Format');
  var audience = get('Target audience knowledge level');

  // Show confirmation dialog with row details
  var ui = SpreadsheetApp.getUi();
  var msg = 'Row: ' + row + '\n'
    + 'Keyword: ' + keyword + '\n'
    + 'Project: ' + project + '\n'
    + 'Current Action: ' + action + '\n'
    + 'Word Count: ' + wordCount + '\n'
    + 'Content Format: ' + format + '\n'
    + 'Audience Level: ' + audience + '\n'
    + '\nThis will set Action to "To_Do" and trigger the SEVOsmith workflow.';

  var result = ui.alert('SEVOsmith — Run Now', msg, ui.ButtonSet.OK_CANCEL);

  if (result !== ui.Button.OK) {
    SpreadsheetApp.getActive().toast('Cancelled.', 'SEVOsmith', 3);
    return;
  }

  // Set Action to To_Do
  var actionCol = headers.indexOf('Action') + 1;
  if (actionCol === 0) return;
  sheet.getRange(row, actionCol).setValue('To_Do');

  // Fire webhook
  UrlFetchApp.fetch(WEBHOOK_URL, {
    method: 'post',
    contentType: 'application/json',
    payload: JSON.stringify({ source: 'manual_button', row: row })
  });

  SpreadsheetApp.getActive().toast('SEVOsmith triggered for "' + keyword + '" (row ' + row + ')', 'Running', 5);
}

// ─── SCHEDULED TRIGGER (every 5 minutes) ────────────────────────────
// Reads only Action + Scheduled DateTime columns (not entire sheet).
// When a keyword's Action = "Planning" and its scheduled time has passed,
// sets Action to To_Do and fires the webhook.
//
// Setup: Triggers UI → + Add Trigger
//   → Function: checkSchedule, Event: Time-driven, Minutes timer, Every 5 minutes
//
function checkSchedule() {
  try {
    var sheet = SpreadsheetApp.getActive().getSheetByName(SHEET_NAME);
    var lastRow = sheet.getLastRow();
    if (lastRow <= 1) return;

    // Read only the 2 columns we need (Action=J=10, Scheduled DateTime=B=2)
    var headers = sheet.getRange(1, 1, 1, sheet.getLastColumn()).getValues()[0];
    var actionCol = headers.indexOf('Action') + 1;   // 1-based
    var schedCol = headers.indexOf('Scheduled DateTime') + 1;
    if (actionCol === 0 || schedCol === 0) return;

    var actions = sheet.getRange(2, actionCol, lastRow - 1, 1).getValues();
    var schedules = sheet.getRange(2, schedCol, lastRow - 1, 1).getValues();

    var now = new Date();
    var triggeredRows = [];

    for (var i = 0; i < actions.length; i++) {
      if (actions[i][0] === 'Planning' && schedules[i][0]) {
        var schedDate = new Date(schedules[i][0]);
        if (schedDate <= now) {
          sheet.getRange(i + 2, actionCol).setValue('To_Do');
          triggeredRows.push(i + 2);
        }
      }
    }

    if (triggeredRows.length > 0) {
      UrlFetchApp.fetch(WEBHOOK_URL, {
        method: 'post',
        contentType: 'application/json',
        payload: JSON.stringify({ source: 'scheduler', rows: triggeredRows })
      });
    }
  } catch (e) {
    // Log but don't fail — transient Google server errors are normal
    Logger.log('checkSchedule error (will retry next cycle): ' + e.message);
  }
}
Step 4.1: Update the Webhook URL
In your copied spreadsheet, go to Extensions → Apps Script. You’ll see the SEVOsmith Scheduler script already loaded. Line 1 contains the webhook URL — replace it with your own n8n webhook URL:
const WEBHOOK_URL = 'https://YOUR-N8N-DOMAIN/webhook/sevosmith-run';Replace YOUR-N8N-DOMAIN with your actual n8n domain (e.g., n8n-prod.yourdomain.com). The path /webhook/sevosmith-run stays the same. Click Save (Ctrl+S).
⚠️ The main workflow must be active in n8n for this webhook URL to work. If you haven’t activated it yet (Part 10), you can set the URL now and activate later — the script will fire correctly once n8n is live.
Step 4.2: Add Two Triggers
In the Apps Script editor, click the clock icon (Triggers) in the left sidebar → + Add Trigger. Add these two triggers:
Trigger 1 — Run Now checkbox:
| Function to run | onSheetEdit |
| Deployment | Head |
| Event source | From spreadsheet |
| Event type | On edit |
Trigger 2 — Scheduled runs:
| Function to run | checkSchedule |
| Deployment | Head |
| Event source | Time-driven |
| Time type | Minutes timer |
| Interval | Every 5 minutes |
Click Save after each trigger. Google will ask you to authorize the script.
Step 4.3: Authorize the Script
Google shows an “unsafe app” warning because the script is not published in the Google Workspace Marketplace. This is normal for any private script. Click through:
- Click Review Permissions
- Choose your Google account
- Click Advanced (bottom left of the warning screen)
- Click Go to SEVOsmith Scheduler (unsafe)
- Click Allow
What you’ll see: after clicking Allow, the Triggers page shows two rows — one for onSheetEdit and one for checkSchedule, both with status “Enabled”. The script is active.
Before You Continue — Part 2 Checklist
- ✅ Reports and Raw Data folders created in Google Drive — folder IDs saved
- ✅ Content Planner copied to your Drive — Spreadsheet ID saved
- ✅ Project_Setting row filled in (all columns except Writer Voice Tone Example)
- ✅ Apps Script webhook URL updated to your n8n domain
- ✅ Two triggers configured (onSheetEdit + checkSchedule) and script authorized
Part 3: Import the Six Core Workflows
⏱️ Estimated time: ~5 min
Import Order Matters
Import sub-workflows before the main workflow. The main workflow references the IDs of all 6 sub-workflows — if you import the main workflow first, you won’t have those IDs yet and will need to update Global Config afterward.
SEVOsmith_Tools_v2.2.0.json

SEVOsmith_Keyword_Research_Engine_v2.2.0.json

SEVOsmith_Image_Generator_v2.2.0.json

SEVOsmith_Publisher_WordPress_v2.2.0.json

SEVOsmith_Publisher_Shopify_v2.2.0.json

SEVOsmith_v2.2.0_The_AI-Citable_Content_Engine.jsonHow to Import Each Workflow
- In n8n, click Workflows → New → Import from File (or use the ⌘K menu and search “import”)
- Select the JSON file
- After import, the workflow opens. Look at the browser URL — the workflow ID is the alphanumeric string at the end:
https://your-n8n/workflow/AbCd1234. Copy the part after/workflow/. Each workflow gets a unique ID specific to your n8n instance. - Copy and save the workflow ID in a notepad
- Repeat for all 6 files
⚠️ After importing, all workflows will show red credential error indicators on nodes. This is expected — do not try to activate any workflow yet. Work through the configuration steps below first.
⚠️ Workflow IDs are unique to your n8n instance. Never copy workflow IDs from another user’s setup, documentation, or the original developer’s files. The IDs you save from your import are the only ones that work on your instance.
Before You Continue — Part 3 Checklist
- ✅ All 6 core workflows imported into n8n
- ✅ All 6 workflow IDs saved in your notepad (Tools, KW Research Engine, Image Generator, WP Publisher, Shopify Publisher, SEVOsmith Modular main)
Part 4: Configure the KW Research Engine v2.2.0
⏱️ Estimated time: ~15 min
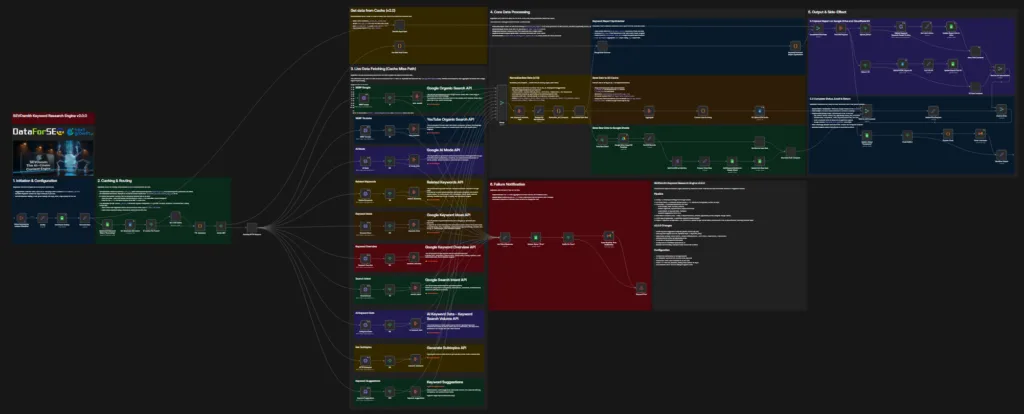
This sub-workflow is called by the main workflow. It runs 10 DataForSEO endpoints in parallel, normalizes the results into a single keyword intelligence object, and returns it to the parent. You never trigger it directly — but you must configure it fully before the main workflow can run.
Step 4.1: Config Node — No Changes Needed
The Config node in the KW Research Engine reads all values dynamically from the main workflow at runtime — including the spreadsheet ID, S3 bucket, and language settings. Do not edit this node manually. All configuration is handled through the Global Config node in the main workflow (Part 9).
Step 4.2: Connect DataForSEO Credentials
The workflow makes 10 parallel API calls — all using the same DataForSEO credential:
- Click any of the HTTP Request nodes labeled with a DataForSEO endpoint name (e.g., “Keyword Overview”, “SERP Google”, “Search Intent”)
- In the node settings, find the Credential for Basic Auth field
- Click Create new credential → select HTTP Basic Auth
- Name: “DataForSEO” | Username: your DataForSEO login email | Password: your DataForSEO API password
- Save and apply this credential to all 10 DataForSEO HTTP nodes. n8n may offer “Apply to all similar nodes” — use that option if available
The 10 endpoints you are connecting to:
- Keyword Overview
- Keyword Ideas
- Related Keywords
- Keyword Suggestions (new in v2.2.0 — was not in v1.5.0)
- Search Intent
- AI Keyword Data
- HTTP Subtopics
- SERP Google
- SERP YouTube
- AI Mode Data
Step 4.3: Connect Google Sheets Credential
- Find the nodes: Get Project Setting, Add Keyword Metrics to Google Sheet, Update Status “Completed”, Update Status “Error”, Update Report Link
- For each, click the credential field and create or select your Google Sheets OAuth2 credential
- If creating new: enter your Client ID and Client Secret from Part 1, Step 2 → click Sign in with Google and complete the OAuth flow
Step 4.4: Connect Google Drive Credential
- Find the Google Drive nodes (used to copy the KW template and upload HTML reports)
- Connect your Google Drive OAuth2 credential — this uses the same OAuth app as Google Sheets
- In n8n, you can create separate Google Drive and Google Sheets credentials pointing to the same OAuth app, or reuse the same one if n8n allows it for both node types
Step 4.5: Connect S3 / Cloudflare R2 Credential
- Find the S3 nodes (used for caching research results and uploading HTML reports)
- Create a new AWS S3 credential in n8n
- Enter your Cloudflare R2 Access Key ID and Secret Access Key
- In the Endpoint field, enter your R2 endpoint URL:
https://[account-id].r2.cloudflarestorage.com - Region:
auto - Apply to all S3 nodes in this workflow
Step 4.6: Connect Gmail Credential
- Find the Gmail node at the end of the workflow (sends the keyword research completion email)
- Connect your Gmail OAuth2 credential — same OAuth app as Sheets/Drive
Step 4.7: Set Up Project Settings in Your Sheet
The KW Research Engine reads its configuration from the Project_Setting tab. Add a row for each project you’ll run. Minimum required columns for the KW Engine to work:
| Column | Example Value | Notes |
|---|---|---|
| Project | Nextgrowth | Must match exactly what you type in the Manager tab |
| Location Code | 2840 | DataForSEO code. Common values: 2840 = USA, 2826 = UK, 2036 = Australia. Full list: dataforseo.com/datasets/locations-and-languages |
| Language Code | en | Two-letter language code |
| Google Drive Folder ID | [your Reports folder ID] | Where HTML reports will be uploaded |
| S3 Bucket Name | sevosmith | Your R2 bucket name — exact match |
| Cloudflare R2 Link | https://pub-xxx.r2.dev | Public URL prefix for R2 reports (from bucket public settings) |
| KW_Cache_TTL_Days | 30 | Days before cached research expires. 30 is the default. |
| KW_Force_Refresh | No | Set to “Yes” to skip the cache and re-run DataForSEO even if cached |
Before You Continue — Part 4 Checklist
- ✅ Config node updated with your Spreadsheet ID
- ✅ DataForSEO HTTP Basic Auth credential connected to all 10 HTTP nodes
- ✅ Google Sheets OAuth2 credential connected
- ✅ Google Drive OAuth2 credential connected
- ✅ Cloudflare R2 (AWS S3) credential connected to all S3 nodes
- ✅ Gmail OAuth2 credential connected
Part 5: Configure the Tools Sub-Workflow v2.2.0
⏱️ Estimated time: ~5 min
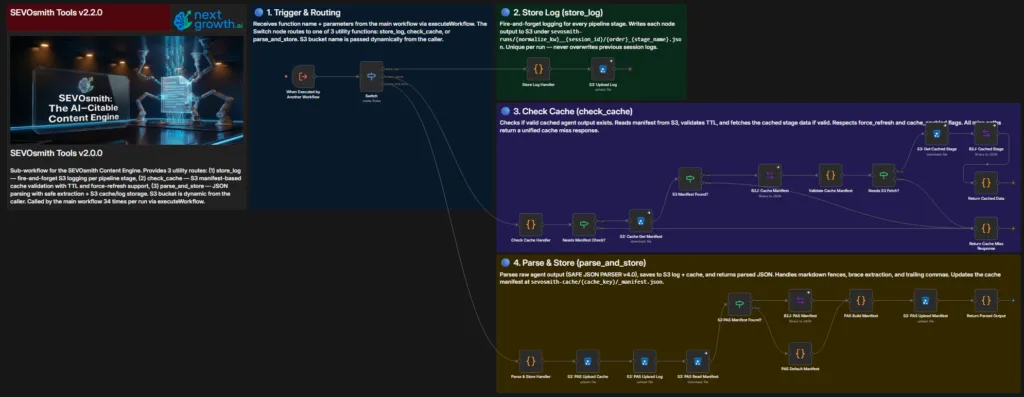
The Tools sub-workflow handles cache checking, content parsing and storage, and run logging. It is called frequently by the main workflow throughout article production. Configuration is minimal — one credential type only.
Step 5.1: Connect S3 / Cloudflare R2 Credential
- Open the SEVOsmith_Tools_v2.2.0 workflow
- Find any S3 node (cache read/write, store output)
- Create or select your AWS S3 credential (your Cloudflare R2 details from Part 1)
- Apply to all S3 nodes in this workflow
Before You Continue — Part 5 Checklist
- ✅ AWS S3 (Cloudflare R2) credential connected to all S3 nodes
Part 6: Configure the Image Generator v2.2.0
⏱️ Estimated time: ~5 min
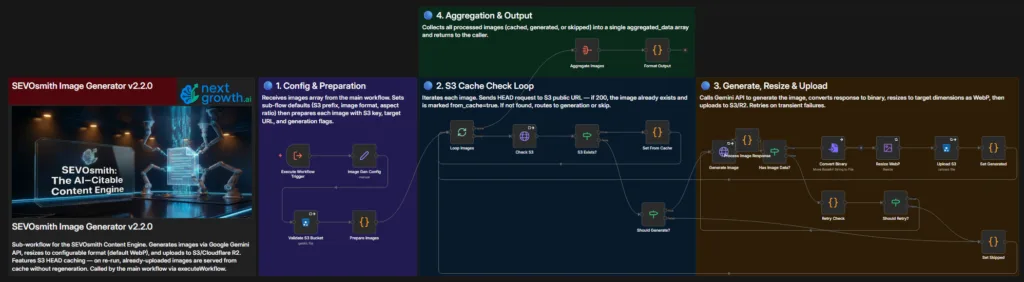
The Image Generator sub-workflow calls the Gemini Imagen API to generate featured images and section images, then uploads them to Cloudflare R2 or WordPress. It uses two credentials: HTTP Header Auth for the Imagen API endpoint, and AWS S3 for R2 uploads.
Step 6.1: Connect Gemini Imagen Credential (HTTP Header Auth)
The Image Generator calls the Gemini Imagen API via HTTP Request nodes using Bearer token auth — not the standard PaLM API credential type:
- Open the SEVOsmith_Image_Generator_v2.2.0 workflow
- Find the HTTP Request node(s) that call the Imagen API
- In the credential field, select HTTP Header Auth
- Create a new credential: Header Name =
Authorization, Header Value =Bearer YOUR-GEMINI-API-KEY(same key from Part 1, Section 3) - Apply to all Imagen HTTP nodes
Step 6.2: Connect S3 / Cloudflare R2 Credential
- Find the S3 node(s) for uploading generated images
- Select your AWS S3 credential (same as other workflows)
- Apply to all S3 nodes
Before You Continue — Part 6 Checklist
- ✅ HTTP Header Auth credential created with Gemini API key and connected to Imagen nodes
- ✅ AWS S3 (Cloudflare R2) credential connected to S3 nodes
Part 7: Configure the WordPress Publisher v2.2.0
⏱️ Estimated time: ~10 min
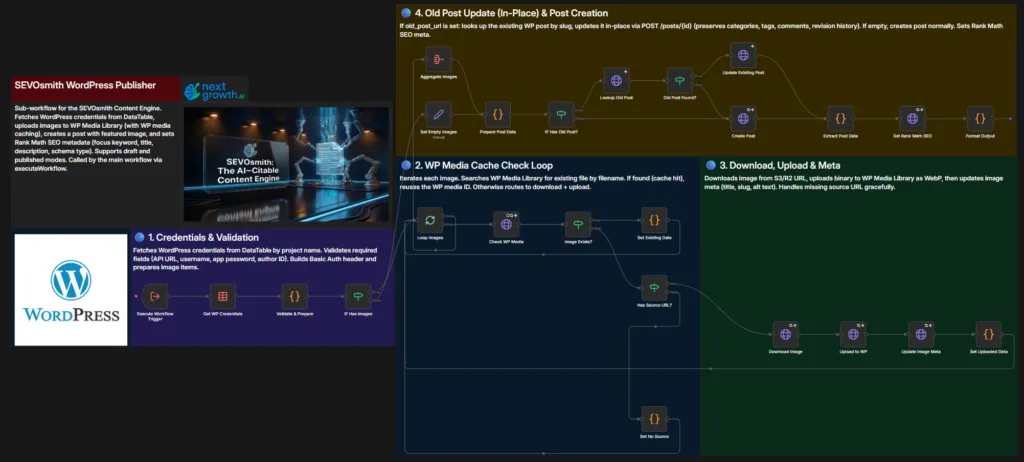
The WordPress Publisher handles post creation, image upload, and RankMath metadata injection. Unlike other workflows, it does not use traditional n8n credentials for WordPress authentication. Instead, it reads site credentials from an n8n DataTable — a built-in database table within your n8n instance. This lets you manage multiple WordPress sites without creating a separate credential per site.
Step 7.1: Create the WordPress_Credentials DataTable
- In n8n, go to the left sidebar → DataTables
- Click + Create DataTable
- Name it exactly:
WordPress_Credentials(case-sensitive) - Add these 5 columns, each with type Text:
| Column Name | Description |
|---|---|
project_name |
Must exactly match the Project column in your Manager tab |
wp_api_url |
Your WordPress REST API base: https://yoursite.com/wp-json/wp/v2 |
wp_username |
Your WordPress username |
wp_app_password |
The Application Password from Part 1, Section 7 |
wp_author_id |
WordPress user ID for article attribution. Find it: Users → All Users → click your user → read user_id=X from the URL. |
- Click Save to create the DataTable structure
- Click + Add Row and fill in your site values
- Add one row per WordPress site you publish to
The WP Publisher workflow has a Get WP Credentials node that is pre-configured with the original developer’s DataTable ID. After you create your own WordPress_Credentials DataTable, you must update this node to point to yours.
⚠️ Update the DataTable ID in the WP Publisher workflow: Open
SEVOsmith_Publisher_WordPress_v2.2.0→ find the node named Get WP Credentials → click it → in the DataTable field, select yourWordPress_Credentialstable from the dropdown (or enter its ID). Save the workflow. If you skip this step, the publisher will query the wrong DataTable and find no credentials.
⚠️ The
project_namevalue must exactly match what you type in the Project column of your Manager tab — it is case-sensitive. A mismatch means the publisher cannot find the credentials for your site.
Before You Continue — Part 7 Checklist
- ✅ WordPress_Credentials DataTable created with all 5 columns
- ✅ At least one site row added (project_name, wp_api_url, wp_username, wp_app_password, wp_author_id)
The publisher injects meta title and description via RankMath’s REST API. See Update Rank Math via n8n: 2 Methods That Actually Work if you want to understand or customize the metadata injection.
Part 8: Configure the Shopify Publisher v2.2.0
⏱️ Estimated time: ~5 min

The Shopify Publisher publishes articles to Shopify blogs. Like the WordPress Publisher, it reads shop credentials from an n8n DataTable. It also uses Gemini for Shopify-specific formatting.
Note: If you do not publish to Shopify, you can skip this part. The main workflow only calls the Shopify Publisher if CMS Platform = Shopify in your Project_Setting row.
Step 8.1: Create the Shopify_Shop_Credentials DataTable
- In n8n, go to DataTables → + Create DataTable
- Name it exactly:
Shopify_Shop_Credentials - Add these 4 columns (type Text):
| Column Name | Description |
|---|---|
store_name |
Must match the Project name in your Manager tab |
my_shopify_unique_domain_name |
Your Shopify store domain: your-store.myshopify.com |
my_shopify_admin_token |
Shopify Admin API access token (from your private app) |
my_shopify_unique_api |
Your Shopify GraphQL API URL: https://your-store.myshopify.com/admin/api/2024-01/graphql.json |
- Save the DataTable and add your store row
- Open
SEVOsmith_Publisher_Shopify_v2.2.0→ find the node named Get Shop Credentials → update the DataTable field to point to your newShopify_Shop_Credentialstable → save the workflow
Step 8.2: Generate Your Shopify Admin API Access Token
- In your Shopify admin, go to Settings → Apps and sales channels
- Click Develop apps (bottom of the page) → Allow custom app development if prompted
- Click Create an app → give it a name (e.g., “SEVOsmith”)
- Click Configure Admin API scopes and enable at minimum:
write_articles,read_articles - Click Save → then click Install app
- The Admin API access token is shown once — copy it immediately (format:
shpat_...). It will not be shown again - Enter this token as the
my_shopify_admin_tokenvalue in your Shopify_Shop_Credentials DataTable row
⚠️ The Shopify access token is shown only once at installation time. If you navigate away before copying it, you must uninstall and reinstall the app to generate a new token.
Step 8.3: Connect Gemini Credential
- Open the SEVOsmith_Publisher_Shopify_v2.2.0 workflow
- Find the Gemini LLM node(s) and connect your Google Gemini (PaLM) API credential
Before You Continue — Part 8 Checklist
- ✅ Shopify_Shop_Credentials DataTable created and store row added (or skipped if not using Shopify)
- ✅ Gemini API credential connected
Part 9: Configure the Main Workflow — AI-Citable Content Engine v2.2.0
⏱️ Estimated time: ~20 min
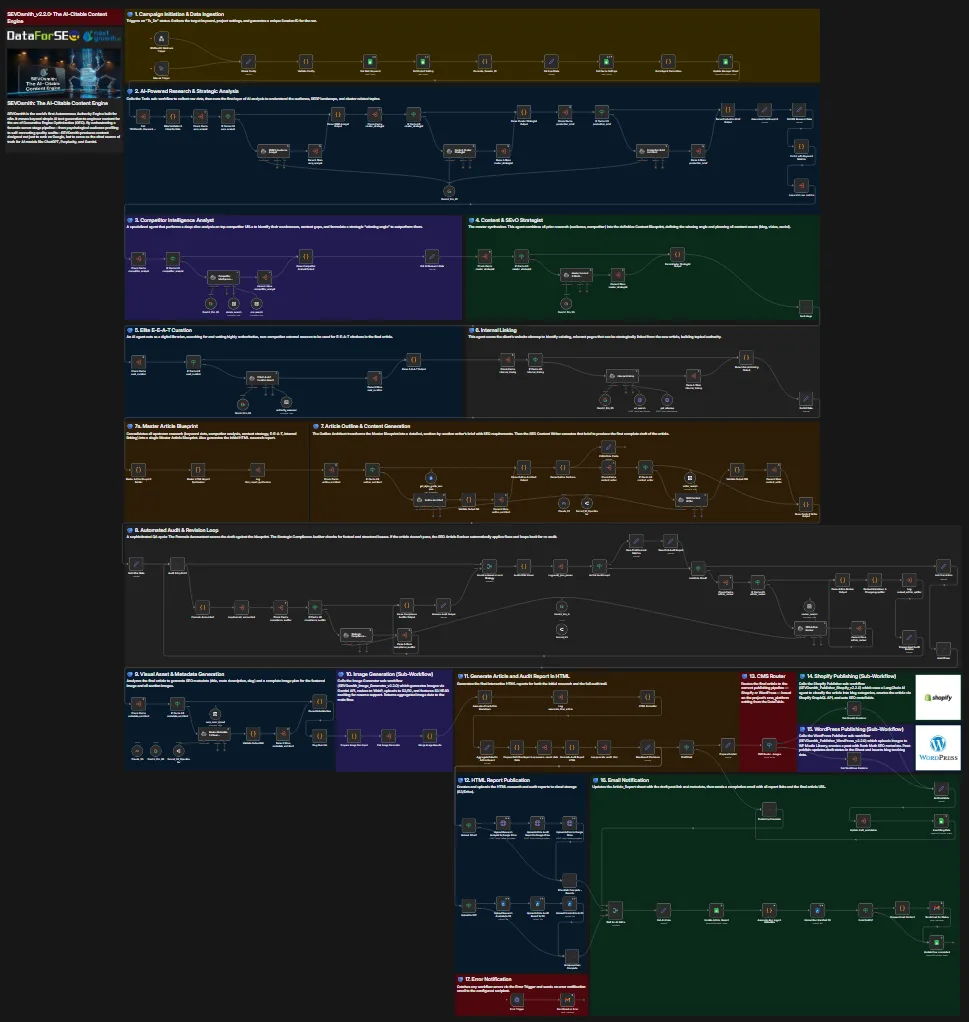
This is the most complex configuration step. The main workflow has 198 nodes across 11 processing zones. The good news: almost all configuration is done in a single node — Global Config.
Step 9.1: Update the Global Config Node
Open the main workflow and find the Global Config Set node (it’s near the start of the workflow, right after the triggers). This is the single most important configuration step in the entire system. All workflow IDs, spreadsheet IDs, notification email, and infrastructure settings live here.
What you’ll see: The Global Config node is a Set node with a yellow icon near the top of the canvas, labeled “Global Config”. Click it and you’ll see a list of fields — one for the spreadsheet ID and one for each workflow ID. All required fields must be filled before activation.
Update every field in this node:
| Field | What to Enter |
|---|---|
| spreadsheet_id | Your Content Planner spreadsheet ID (from Part 2) |
| tools_workflow_id | Tools v2.2.0 workflow ID (from your notepad in Part 3) |
| keyword_research_workflow_id | KW Research Engine v2.2.0 workflow ID |
| image_generator_workflow_id | Image Generator v2.2.0 workflow ID |
| wp_publisher_workflow_id | WordPress Publisher v2.2.0 workflow ID |
| spf_publisher_workflow_id | Shopify Publisher v2.2.0 workflow ID. Field name is spf_ not shopify_ — enter exactly as shown. Fill in even if you are not using Shopify. |
| error_notification_email | Email address to receive error alerts (can be same as Send To Email) |
| engine_version | Leave as-is — pre-filled with the current version string |
| agent_model_map | Leave as-is unless you need to override specific agent models |
⚠️ The Global Config node is the single most common setup mistake. Workflow IDs change every time you import into a new n8n instance — the IDs from the original developer’s setup will not work on your instance. Every field in Global Config must be correct before activation. A wrong workflow ID causes silent failures that are difficult to trace.
Step 9.2: Connect All Credentials
The main workflow uses 10 credential types. Work through each zone. For most credential types, connecting it to one node and using n8n’s “Apply to all similar nodes” feature will update all matching nodes at once.
Google Services (Sheets, Drive, Docs, Gmail)
All use the same Google OAuth2 app — but n8n requires separate credentials per service type:
- Google Sheets OAuth2 → nodes: Get Main Keyword, Get Project Setting, Update Manager Sheet, Get Cache Settings, Update Article_Report, Update flow_completed
- Google Drive OAuth2 → nodes: report upload nodes in Zone 9
- Google Docs OAuth2 → nodes: get_style_guide_samples tool (inside the Outline Architect LangChain agent)
- Gmail OAuth2 → nodes: Send Email on Error, Send Email for Status
AI Model Credentials
- Google Gemini (PaLM) API → apply to all Gemini LLM nodes
- Anthropic API → apply to the Claude LLM nodes (2 nodes in the main workflow — look for nodes using the Anthropic credential type)
- Perplexity API → apply to the pro_search and simple_search nodes inside the Competitor Intelligence Analyst agent
- OpenRouter API → apply to the Sonnet LLM nodes (Outline Architect, Article Reviser, and Metadata Architect)
For OpenRouter: in n8n, create a new OpenRouter API credential type (search “OpenRouter” in the credential type dropdown — it is a native n8n credential). Enter your OpenRouter API key (sk-or-...). The nodes will reference OpenRouter model IDs such as anthropic/claude-sonnet-4.6 — do not change these.
Infrastructure Credentials
- Firecrawl API (HTTP Header Auth) → apply to the url_search and get_sitemap nodes inside the Internal Linking Analyst agent (Zone 4)
Create as HTTP Header Auth: Header Name =Authorization, Header Value =Bearer your-firecrawl-key - AWS S3 / Cloudflare R2 → apply to all 4 S3 upload nodes in Zone 9: Upload Article Audit Report, Upload Research Analysis, Upload Final Article, Upload Run Manifest
Step 9.3: Activate the Workflow
- Once all credentials are connected and show no red warning indicators, toggle the workflow to Active
- The webhook endpoint is now live:
https://your-n8n-domain/webhook/sevosmith-run - For testing, you can also trigger it manually using Execute Workflow in the n8n editor
Before You Continue — Part 9 Checklist
- ✅ Global Config node updated: Spreadsheet ID + all 6 sub-workflow IDs + error email filled in
- ✅ All 10 credential types connected (Google Sheets, Drive, Docs, Gmail, Gemini, Anthropic, Perplexity, OpenRouter, HTTP Header Auth/Firecrawl, S3/R2)
- ✅ SEVOsmith_v2.2.0_The_AI-Citable_Content_Engine workflow activated
Part 10: Complete Your Project Settings
⏱️ Estimated time: ~5 min
You filled in the Project_Setting tab in Part 2, Step 3. There is one field left: Writer Voice Tone Example. This requires a Google Doc you create — it cannot be set until you have content to put in it.
Create Your Style Guide Document
The Writer Voice Tone Example field in Project_Setting points to a Google Doc that the Outline Architect reads before building every article structure. This is how the system learns your brand voice — not from a settings field, but from real examples of your writing.
Create a new Google Doc and include:
- 2–3 examples of your best-performing existing articles (full text or long excerpts)
- Tone description: formal / conversational / expert / beginner-friendly
- Formatting preferences — do you use heavy bullet lists? Short paragraphs? Tables?
- Words or phrases to avoid
- Any structural patterns you always use (e.g., always start with a TL;DR box, always end with a FAQ)
The more specific this document, the more consistently the Writer Agent will match your voice across every article run.
- Create the Google Doc in your Drive
- Share it with the same Google account you used for OAuth in n8n (the Docs API must be able to read it)
- Copy the Doc ID from the URL:
https://docs.google.com/document/d/[DOC-ID-HERE]/edit - In your Content Planner → Project_Setting tab, paste the Doc ID into the Writer Voice Tone Example column for your project row
Part 11: First Test Runs
⏱️ Estimated time: ~90 min
⚠️ This test will consume real API credits across DataForSEO, Gemini, OpenRouter, and Perplexity. Use a short, low-competition keyword for your first run (e.g., a long-tail term in your niche with difficulty under 30). Avoid broad head terms — they generate more API calls and cost more.
Test: Full Article Run — AI-Citable Content Engine v2.2.0
- In your Content Planner → Manager tab, add a new row:
- Project: [exactly as entered in Project_Setting]
- Keyword: a low-competition keyword (difficulty < 30 for your first test)
- Word Count: 1500 or leave empty the outline agent will decide
- Content Format: Blog Post
- Target audience knowledge level: Intermediate
- Action: To_Do
- Trigger the workflow using the Run Now checkbox — this is the recommended method for day-to-day use:
- Tick the Run Now checkbox on the row you just added
- Click OK in the confirmation dialog
- Alternatively, for a direct test without the sheet: open the main workflow in n8n and click Execute Workflow
- Monitor in n8n’s execution view — you’ll see it progress through each zone. The progress bar in each sub-workflow call shows which stage you’re in. What you’ll see: open the Executions tab for the main workflow — the current run shows a spinning icon. It will remain active for 30–60 minutes. This is normal. Do not stop or re-trigger the execution while it is running.
- Expected total runtime: 20–30 minutes for a 1,500-word article
Expected outputs when successful:
- Manager tab row updated to “Completed”
- Article_Report tab has a new row with: title, meta description, WordPress draft link, R2 report links, quality score, word count, duration, cost estimate
- WordPress draft post created
- Completion email received (if email_notify = Yes)
- KW_Research_Report tab has a new row for this keyword
- ✅ Test passed: WordPress draft created in your site and Article_Report row populated with all output fields
Part 12: Reviewing Your Outputs
After a successful article run, you have five output types to review:
1. The Article_Report Tab
Your first stop. Every produced article has a row here with: SEO title, meta description, WordPress draft URL, research report URL, audit report URL, quality score (out of 100), word count, total execution duration, and approximate API cost.
2. The WordPress Draft
Click the draft URL in Article_Report. The post will be in draft status with: full article content, featured image (if image generation is enabled), meta title and description (injected via RankMath), and correct slug. Your job: review for brand voice, add any proprietary insights or original examples, and publish when ready.
3. The Research Report (HTML)
An interactive HTML file covering the Zone 3–5 intelligence: keyword research data, SERP analysis, competitor landscape, audience profile, E-E-A-T sources, internal link recommendations, and the content blueprint. Open the R2 link from Article_Report. Use this report to understand what the AI agents found and why the article was structured the way it was.
4. The Audit Trail Report (HTML)
Documents Zone 7: every error the Compliance Auditor found, every fix the Reviser applied, every issue escalated to human review with a reason code, and the final quality score breakdown by category. If the article has a human_review_suggestions section, this report tells you exactly what needs your attention and why the system couldn’t handle it automatically.
5. The Completion Email
Sent to your configured email address. Contains: article title, quality score, WordPress draft link, research and audit report links, word count, and execution time. Useful as a notification that a queued article is ready for review.
Part 13: Adding Articles to the Queue
Once setup is complete, your daily operation is entirely from the Manager tab. Fill in a row with your keyword and settings, then trigger it using the Run Now checkbox or the Scheduled DateTime column. The system handles the rest. Here are all the input columns:
| Column | Options | Notes |
|---|---|---|
| Project | e.g., Nextgrowth | Must match Project_Setting row exactly |
| Keyword | e.g., keyword research tools | Your primary target keyword |
| Word Count | e.g., 2000 | Target word count. Leave blank for the AI to decide based on format. |
| Content Format | Guide / How-To / Comparison / Listicle / Case Study / Review / Blog Post / Definition / News | Determines the article structure, required elements, and schema type. The system uses internal machine IDs: comparison_versus, how_to_tutorial, pillar_ultimate_guide, listicle_roundup, case_study, product_review, blog_post, definition_glossary, news_trend_analysis. The friendly labels in the Options column map to these IDs automatically. |
| Target audience knowledge level | Beginner / Intermediate / Advanced / Expert | Adjusts vocabulary complexity, jargon level, and example depth |
| Additional Instruction | Free text | Optional. Specific requirements for this article (e.g., “Include a comparison table of the top 5 tools”) |
| Action | To_Do / Processing / Completed / Error | Set to “To_Do” to queue the article. The workflow updates this automatically. |
| Scheduled DateTime | e.g., 2026-03-10 09:00 | Set a future date and time. Set Action to Planning and the Apps Script will fire automatically when the time arrives. |
| Run Now | Checkbox (tick to trigger) | Tick this checkbox to trigger the workflow immediately for this row. A confirmation dialog shows keyword details before firing. The box unchecks itself after confirming. |
| use_cache | Yes / No | “No” forces a fresh DataForSEO run even if cached research exists for this keyword |
| Old Post URL | URL | For content refreshes — pass the existing post URL to include its content in the research context |
How to Trigger an Article Run
Option 1 — Run Now (immediate)
- Fill in the row: Project, Keyword, Word Count, Content Format, Audience Level
- Tick the Run Now checkbox in that row
- A confirmation dialog appears showing your keyword and settings — click OK
- The script sets Action to
To_Do, fires the n8n webhook, and unchecks the box - A toast notification confirms: “SEVOsmith triggered for [keyword] (row X)”
What you’ll see in n8n: within a few seconds, a new execution appears in the Executions tab for the main workflow with a spinning icon. The article run has started.
Option 2 — Scheduled DateTime (automatic)
- Fill in the row: Project, Keyword, Word Count, Content Format, Audience Level
- Set Action to
Planning - Set Scheduled DateTime to a future date and time (e.g.,
2026-03-10 09:00) - The
checkSchedulescript runs every 5 minutes. When the scheduled time arrives, it sets Action toTo_Doand fires the webhook automatically — no manual step needed
⚠️ Action = “To_Do” alone does not trigger the workflow. Manually typing “To_Do” into the Action column does nothing on its own — the n8n webhook only fires when the Apps Script sends it. Use the Run Now checkbox or the Scheduled DateTime + Planning approach to trigger a run.
Part 14: Troubleshooting
Workflow stops at “Get Main Keyword” with no output
Cause: No rows in the Manager tab have Action = “To_Do”.
Fix: Add a row with Action set to “To_Do” and save the spreadsheet. Wait a few seconds for Google Sheets to sync, then re-trigger.
Sub-workflow fails with “Workflow ID not found” or “Invalid workflow”
Cause: The workflow IDs in the Global Config node don’t match the IDs of the workflows you imported. This is the single most common setup error.
Fix: Open each sub-workflow in n8n and copy the ID from the URL bar. Go back to the main workflow’s Global Config Set node and update each ID field.
DataForSEO nodes fail with 401 or 403 errors
Cause: Wrong credentials or insufficient balance.
Fix: (1) Verify your DataForSEO credential uses your email as username and the API password (not your account login password). (2) Check your DataForSEO account balance — if it’s at $0, top it up. (3) Confirm the credential is applied to all DataForSEO HTTP nodes, not just the first one you edited.
Google OAuth errors after a few weeks
Cause: OAuth2 tokens expire periodically.
Fix: In n8n, go to Credentials → [Your Google Credential] → Reconnect and complete the OAuth flow again. You may need to do this for each Google service credential (Sheets, Drive, Docs, Gmail) separately.
S3 nodes produce errors but the workflow continues
Cause: S3 nodes in Zone 9 have continueOnError enabled — a storage failure won’t stop article production, but reports won’t be saved.
Fix: (1) Verify your R2 Access Key ID and Secret match exactly what Cloudflare shows. (2) Verify the bucket name in Project_Setting matches your actual R2 bucket name (case-sensitive). (3) Confirm the R2 API token has Object Read & Write permissions.
WordPress Publisher fails — no draft created
Cause: The project_name in your WordPress_Credentials DataTable doesn’t match the Project field in the Manager tab row.
Fix: Open the DataTable (n8n sidebar → DataTables → WordPress_Credentials) and verify the project_name value matches exactly — it is case-sensitive. Also verify wp_api_url ends with /wp-json/wp/v2 (no trailing slash).
OpenRouter / Claude nodes fail
Cause: OpenRouter credential not created with the correct native credential type.
Fix: In n8n Credentials, search for “OpenRouter” and select the OpenRouter API credential type. Enter your sk-or-... key in the API Key field. Do not use the OpenAI credential type — the workflow nodes specifically expect the native OpenRouter credential.
Gemini nodes fail with 429 or 403 errors
Cause (403): Billing is not enabled on the Google Cloud project associated with your Gemini API key. The free tier quota runs out quickly in production.
Fix: Go to console.cloud.google.com/billing → link a billing account to the project that holds your Gemini API key.
Cause (429): Rate limit hit — too many concurrent Gemini calls.
Fix: The workflow has built-in retry logic. If you see persistent 429s, open the failing agent node and reduce parallelism, or switch the agent to a different Gemini model variant with a higher quota (e.g., gemini-1.5-flash instead of gemini-1.5-pro).
Anthropic / Claude direct API nodes fail
Cause: Insufficient Anthropic account balance, or the model ID in the node references a deprecated model name.
Fix: (1) Go to console.anthropic.com and verify your account has a positive credit balance. (2) If the error mentions an invalid model, open the failing Anthropic LLM node and update the model field to a current model ID (e.g., claude-sonnet-4-5-20251001). Anthropic deprecates old model IDs periodically — check their docs for the current recommended ID.
Frequently Asked Questions
What n8n plan do I need for SEVOsmith v2.2.0?
You need n8n Cloud Starter plan or higher, or a self-hosted n8n Enterprise instance. For a complete self-hosting walkthrough, see our guide to deploying n8n with Coolify. The WordPress and Shopify publisher sub-workflows use DataTables — an n8n built-in database feature that stores your site credentials. DataTables are not available on n8n Community (free self-hosted). If you are on Community and want to use SEVOsmith, contact us for an alternative credential setup approach.
How much will setup cost across all 9 API services?
Budget $20–30 in API credit to complete setup and run 3–5 test articles. The biggest initial costs are DataForSEO ($5 minimum deposit, ~$0.10–0.15 per keyword run) and OpenRouter ($10 suggested credit). Gemini, Perplexity, Firecrawl, and Anthropic all have free tiers or low minimum deposits. Cloudflare R2 is free for the first 10GB and 1M reads per month. Per-article cost in production: $1.02–1.88 covering all API calls.
How long does the first setup take?
Plan for ~3 hours end-to-end: ~90 min for API account creation and Google Cloud OAuth setup (the most time-consuming step), ~60 min for workflow import and credential wiring, ~30 min for spreadsheet configuration and Apps Script, and ~30–60 min for your first test run. If you are upgrading from v1.5.0, expect closer to 90 minutes total since most API accounts and Google OAuth are already in place.
Do I need all 9 API accounts before I can test the system?
Yes — all 9 credentials must be connected before the first run. However, you can skip Shopify entirely if you only publish to WordPress. The Shopify Publisher only runs when CMS Platform = Shopify in your Project_Setting row, so missing Shopify credentials won’t block a WordPress-only test.
What happens if a sub-workflow fails mid-run?
It depends on which sub-workflow fails. S3/R2 upload failures continue silently (the article still publishes, reports just don’t save). Image Generator failures are caught and the article publishes without images rather than stopping the entire run. KW Research Engine or Publisher failures update the Manager tab row status to “Error” and send an error email. Check the Article_Report tab and your error notification email for the specific failure zone and cause.
Can I run multiple articles simultaneously?
The system is designed for one article run at a time. Each run calls multiple sub-workflows with concurrent API calls to DataForSEO, Gemini, Perplexity, and Anthropic. Running two articles simultaneously multiplies concurrent API calls and will hit rate limits on most services. Use the Scheduled DateTime column to queue articles with staggered start times — 40–60 minutes apart is safe for most API tier limits.
A Note on Quality Expectations
SEVOsmith automates the research, structuring, writing, auditing, and publishing of an article. That is the 80%. The remaining 20% is yours.
The system produces a publication-ready draft — not a finished article. Plan for a 15–20 minute human review before publishing: check the brand voice, add any original insights or proprietary examples specific to your experience, verify the human_review_suggestions in the audit trail report (these are issues the system documented but could not resolve automatically).
The total workflow for a 2,000-word article: 30–60 minutes of machine time, 15–20 minutes of human review. That is 45–80 minutes versus 4–6 hours for the manual equivalent — with a complete audit trail showing exactly what was researched, what quality criteria were checked, and what still needs your attention.
The system is not a replacement for editorial judgment. It is the infrastructure that handles the parts of content production that do not require your judgment — so you can spend your time on the parts that do.
Skip the Setup — Let Us Do It For You
Setup takes ~3 hours if everything goes right. Credential errors, DataTable mismatches, and OAuth flows can turn that into a full day. If you’d rather have it working correctly the first time, we’ll handle it.
| Tier | What’s Included | Price |
|---|---|---|
| Setup Only | We configure all 6 workflows on your n8n instance, connect all 9 credentials, create DataTables, configure the Content Planner and Apps Script, and deliver one successful test article. You provide access and API keys — we hand back a working system. | $279 |
| Custom Work | Modifications, new publishers, troubleshooting, new content formats, multi-site configuration, or anything not covered above. Fixed quote available for larger requirements. | $30/hr |
What you need before booking: n8n Cloud Starter plan or self-hosted instance with Enterprise features (required for DataTables). All API accounts can be created during setup — you don’t need them ready before booking.