How to Get Cloudflare R2 Access Key for n8n
If you’re running n8n workflows that generate files—images from AI, PDFs, screenshots, whatever—you need somewhere to store them. I’ve tried various solutions, and Cloudflare R2 has become my go-to for one simple reason: zero egress fees.
TL;DR
- Cloudflare R2 is zero-egress-fee object storage that is fully S3-compatible, meaning n8n’s existing AWS S3 node works with R2 credentials — no custom code or plugins required.
- Setup requires creating an R2 bucket, generating an API token with Object Read & Write permissions, and using your account’s S3-compatible endpoint URL in n8n credentials.
- Unlike AWS S3, R2 charges nothing for data transfer out, making it the cost-effective default for n8n workflows that generate and serve large volumes of files or images.
Think about it. With AWS S3, every time someone views an image your workflow generated, you pay for that download. Build a successful automation that generates 1,000 images that each get viewed 100 times? That’s 100,000 egress charges. With R2, that’s zero dollars in egress costs.
Plus, R2 is S3-compatible, which means you can use n8n’s existing AWS S3 node. No special plugins, no custom code. Just configure credentials and you’re done.
Contents
- What You Need Before Starting
- Step 1: Create Your R2 Bucket
- Step 2: Configure Basic Bucket Settings
- Step 3: Generate Your R2 Access Key
- Step 4: Connect R2 to n8n
- Step 5: Build a Test Upload Workflow
- Keep Costs Down
- Security Best Practices
- What You’ve Built
- Troubleshooting Common Issues
- Frequently Asked Questions
R2 vs S3: What You Actually Pay
| Cost Category | Cloudflare R2 | AWS S3 |
|---|---|---|
| Storage (per GB/month) | $0.015 | $0.023 |
| Egress (per GB) | $0.00 | $0.09 |
| Class A ops (writes, per 1M) | $4.50 | $5.00 |
| Class B ops (reads, per 1M) | $0.36 | $0.40 |
| Free tier storage | 10 GB | 5 GB (12 months) |
Real-world example: An n8n workflow generating 5,000 images per month (avg 500 KB each), each viewed 50 times, costs $0 in egress on R2 vs ~$11.25/month on S3 just in data transfer — and that gap only grows with traffic.
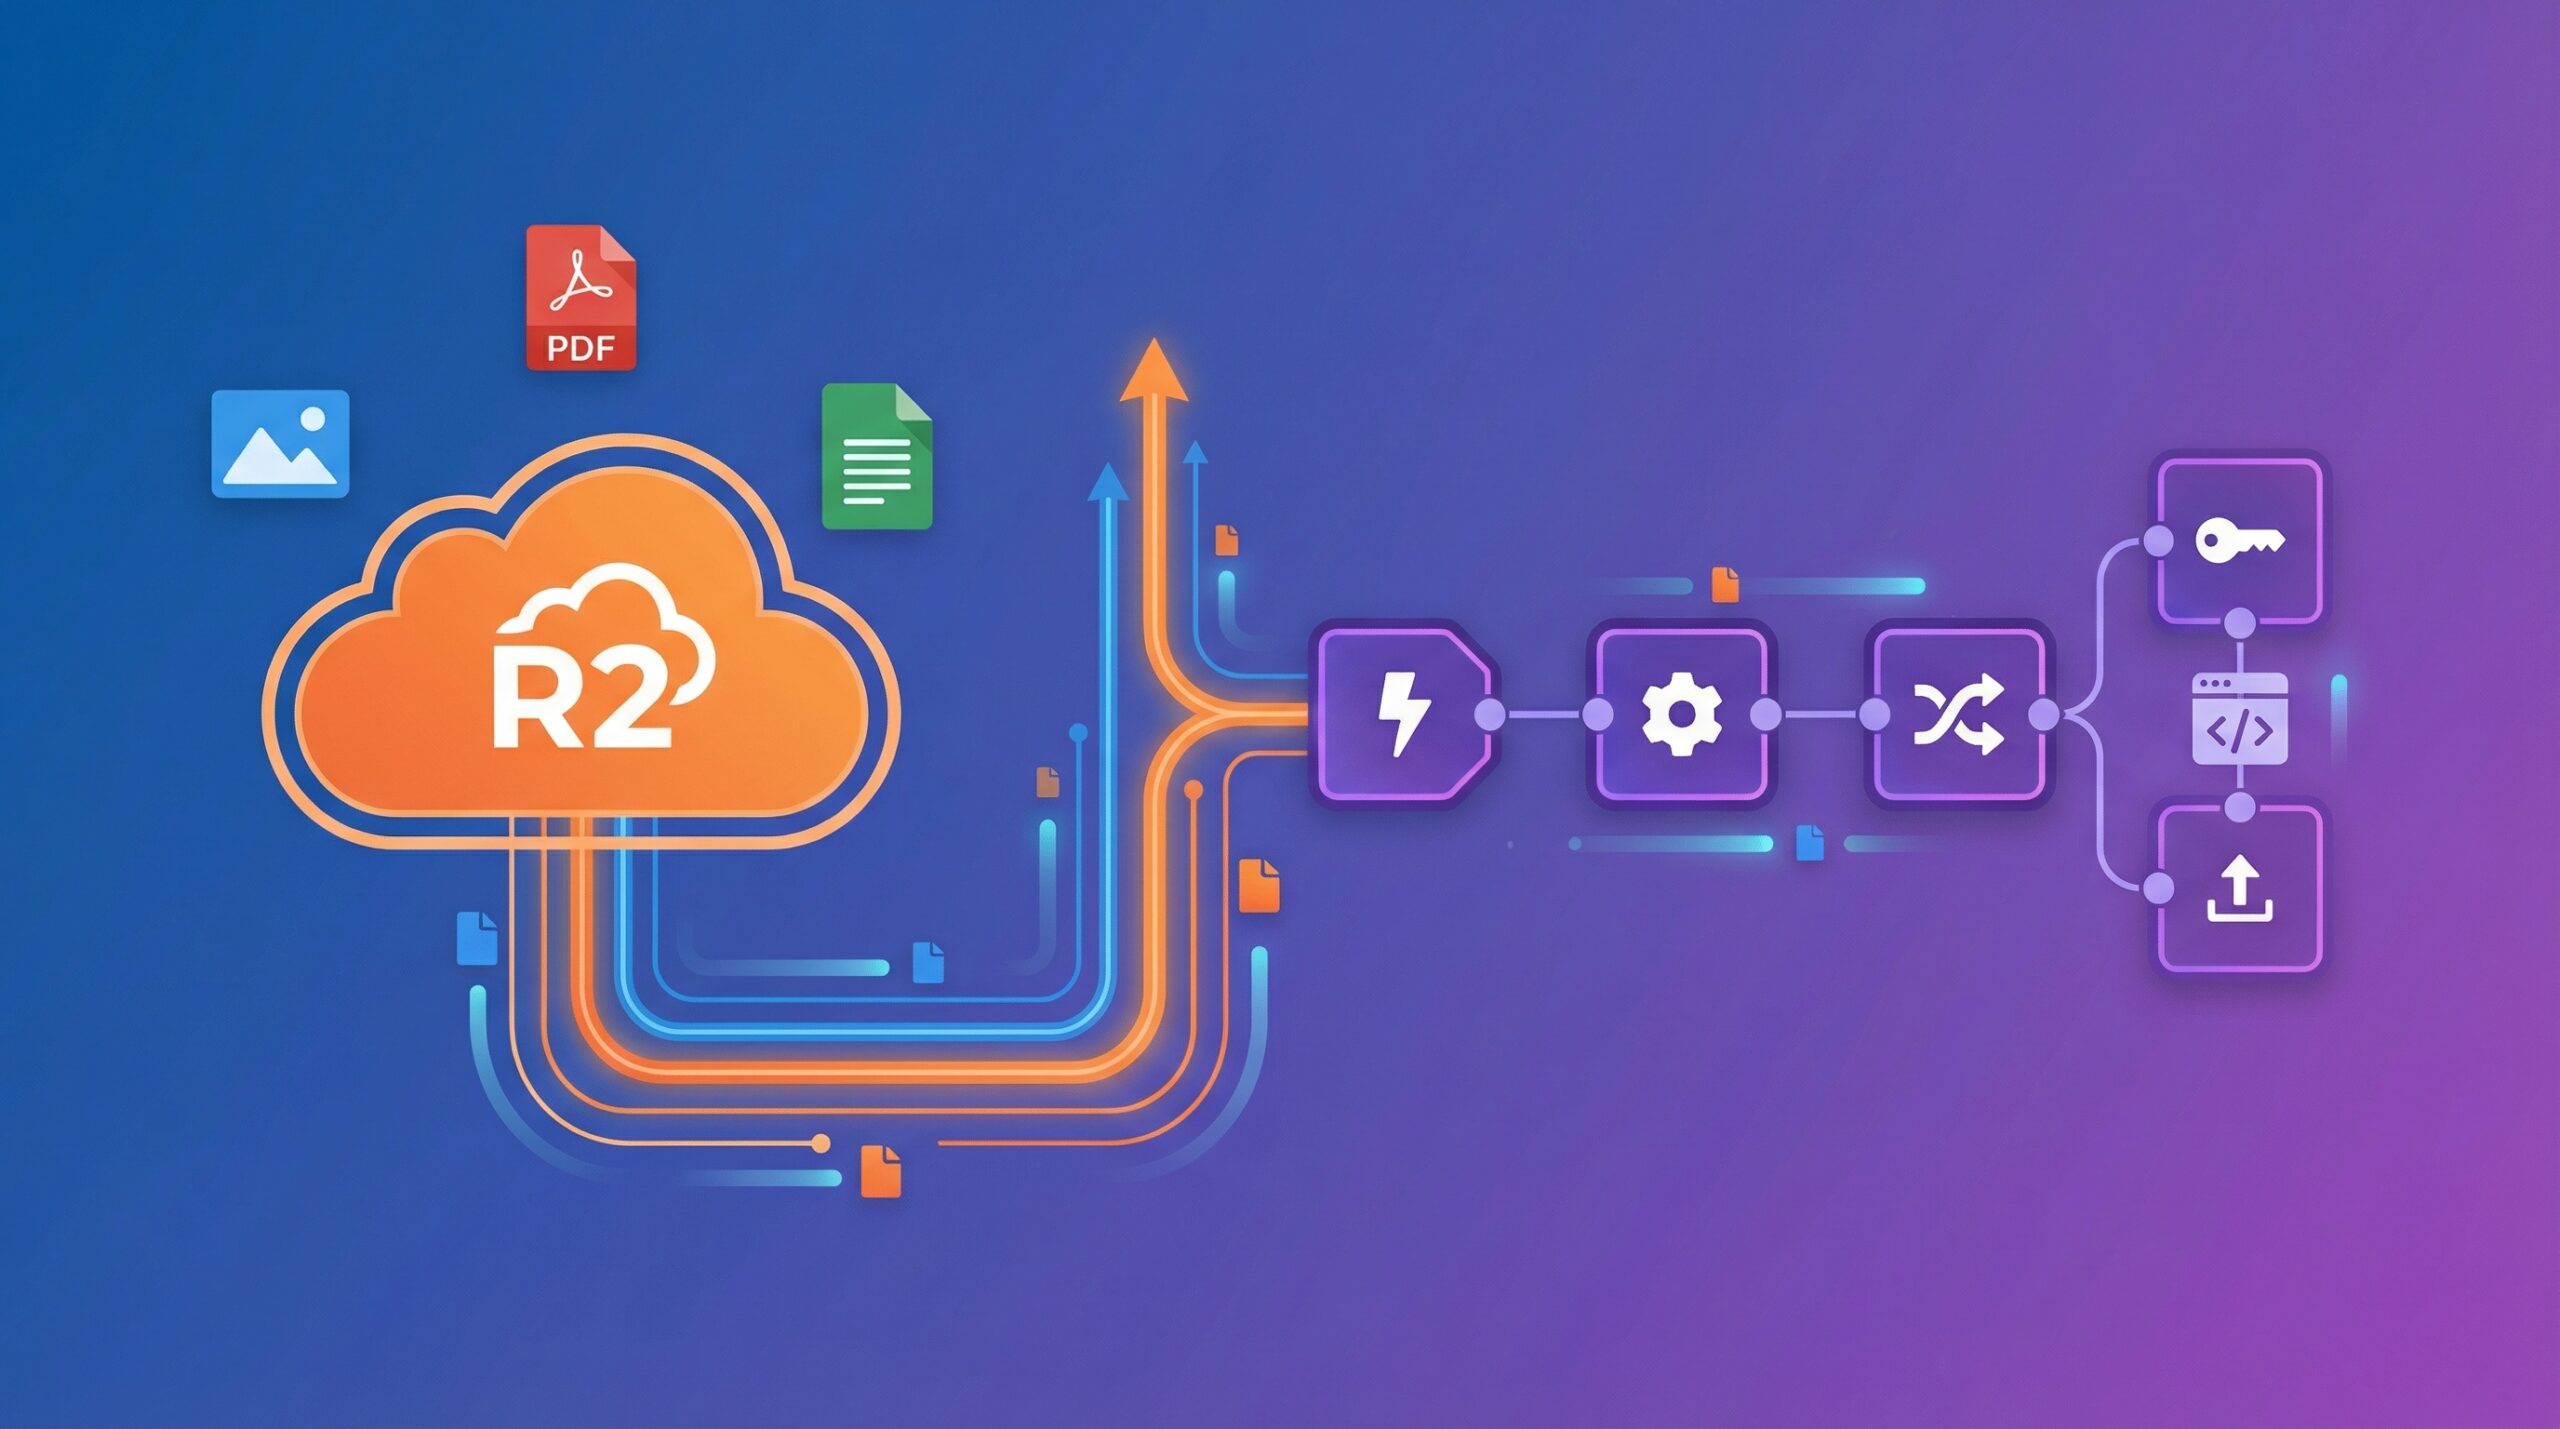
Here’s what we’re building: a complete R2 setup that connects to n8n, ready for production workflows.
What You Need Before Starting
Before we dive in, make sure you have:
- A Cloudflare account with a payment method on file (required even for free tier)
- A running n8n instance (self-hosted or cloud)
- 15-20 minutes
That’s it. Let’s get started.
Step 1: Create Your R2 Bucket
A bucket is basically a container for your files. Think of it as a top-level folder in the cloud.
Navigate to R2:
- Log into Cloudflare
- Click “R2 object strorage” in the left sidebar (under Storage & database)
- Click “Create bucket”
Configure the bucket:
Bucket name needs to be globally unique and lowercase. I use descriptive names like: n8n-sevosmith
If your first choice is taken, add your company name or a unique identifier.
Location: I usually select “Automatic” unless you have specific compliance requirements. Cloudflare optimizes placement automatically.
Click “Create bucket” and you’re done with step one.

Click “Create bucket” and you’re done with the basic setup.
Step 2: Configure Basic Bucket Settings
After creating your bucket, you’ll land inside the bucket view. Now let’s configure some essential settings. Click on your bucket name to access the Settings tab.
Enable Public Development URL
For most n8n workflows, you’ll want files to be publicly accessible—especially if you’re generating images for blog posts or serving static assets.
- In the Settings tab, find “Public Development URL”
- Click Enable, then type “allow” in the pop-up
Cloudflare automatically assigns a public URL: https://pub-<random-hash>.r2.dev
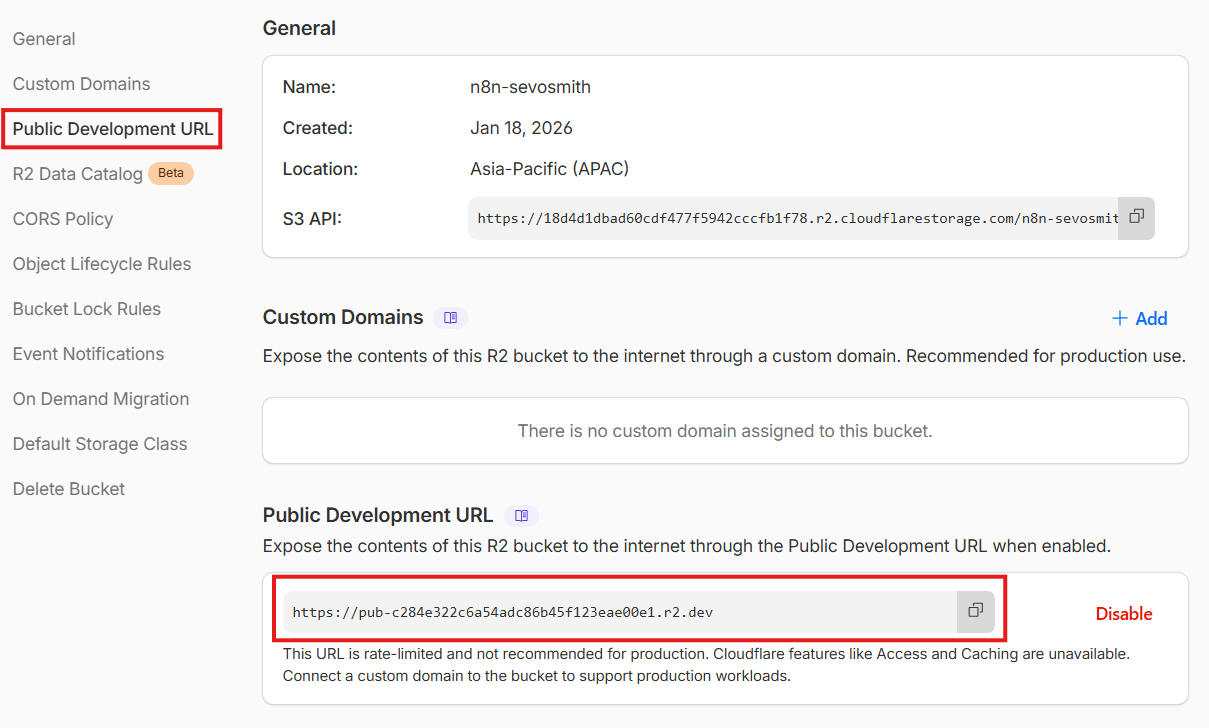
Any file you upload becomes immediately accessible at https://pub-<random-hash>.r2.dev/filename.jpg. This works perfectly for development and internal tools. The random hash isn’t pretty, but it’s functional and requires zero additional setup.
Custom Domains (Optional)
For production environments or client-facing projects, you might want branded URLs like https://cdn.yourdomain.com/image.jpg instead of the default R2.dev subdomain.
Setting up a custom domain is straightforward if your domain is already on Cloudflare:
- In bucket settings, find “Custom Domains”
- Click “Connect Domain”
- Enter your subdomain (like
cdn.yourdomain.com) - Cloudflare adds DNS records automatically
For domains managed outside Cloudflare, you’ll need to manually add CNAME records. The process is detailed in Cloudflare’s custom domain documentation.
My recommendation: Start with the default pub-*.r2.dev URL. It works great for n8n automation workflows, testing, and internal tools. Only set up custom domains when you’re ready for production or need branded URLs for client deliverables.
Other Settings:
The Settings tab shows several other options like CORS Policy, Object Lifecycle Rules, and Event Notifications. We’ll cover the important ones later in this guide. For now, enabling public access is all you need to get started.
Step 3: Generate Your R2 Access Key
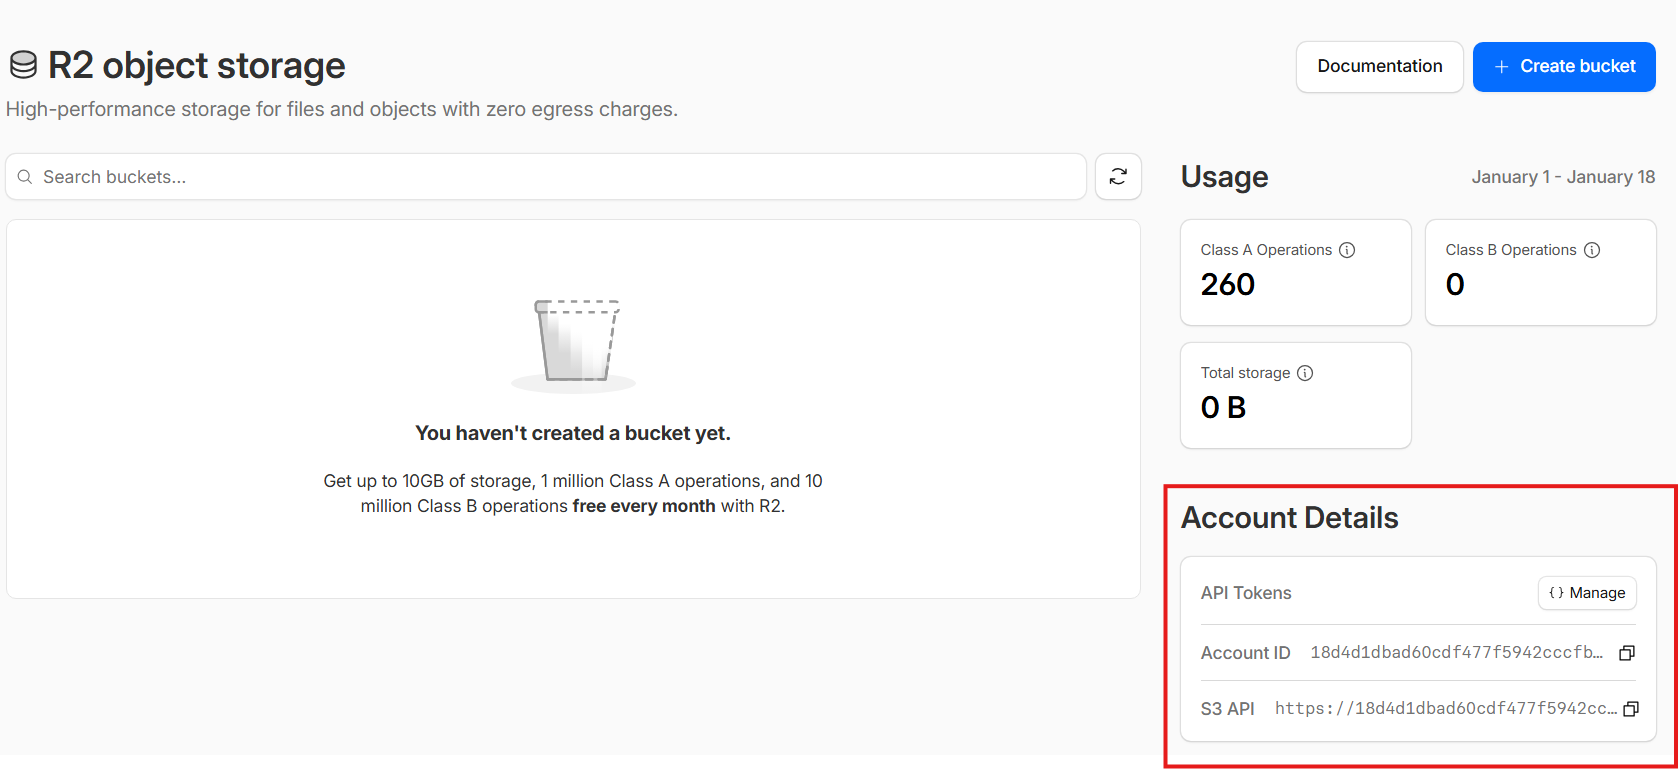
After creating the bucket, you’ll land inside the bucket view. To return to the main R2 dashboard, click “R2 Object Storage” in the breadcrumb navigation at the top.

From the dashboard, you can view your Account Details on the right side, where you’ll find your Account ID and API token management options.
Access API tokens:
- In your R2 dashboard, click “Manage R2 API Tokens”
- Click “Create Account API tokens”
Configure your token:
Token name: Use something descriptive like SEVOsmith_R2_Account_Token. When you’re troubleshooting at 2 AM, you’ll thank yourself for clear naming.
Permissions: For n8n workflows that upload AND read files, select “Admin Read & Write”. If you only need read access, choose more restrictive permissions.
TTL: Leave blank for production workflows. You don’t want automation breaking because credentials expired.
Click “Create API Token”.
Cloudflare shows credentials ONCE. You’ll see three critical pieces:
- Access Key ID: Looks like
a1b2c3d4e5f6g7h8i9j0 - Secret Access Key: Longer string like
k1l2m3n4o5p6q7r8s9t0u1v2w3x4y5z6a7b8c9d0 - Endpoint URL: Format is
https://<account-id>.r2.cloudflarestorage.com
Copy all three to a password manager or secure note. Once you close this dialog, the Secret Access Key is gone forever. You’ll need to generate new credentials if you lose it.

Finding Your Account ID:
Your Account ID is needed for the complete endpoint URL. You can find it in two places:
Method 1: From the Dashboard URL
Look at your browser’s address bar when you’re in the R2 dashboard:
https://dash.cloudflare.com/18d4d1dbad60cdf477f5942cccfb/r2
↑ This is your Account ID ↑Method 2: From Account Details
In the R2 dashboard, look at the right sidebar under “Account Details”. Your Account ID is displayed there with a copy button.
Your Complete Endpoint:
Combine your Account ID with the R2 domain:
https://18d4d1dbad60cdf477f5942cccfb.r2.cloudflarestorage.comThis is the exact value you’ll paste into n8n’s S3 Endpoint field.
Step 4: Connect R2 to n8n
Here’s where everything comes together. R2 is S3-compatible, so we use n8n’s AWS S3 node.
Create credentials in n8n:
- Open n8n
- Go to Credentials (sidebar or workflow editor)
- Click “Add Credential”
- Search for “S3” and select it
Fill in the fields:
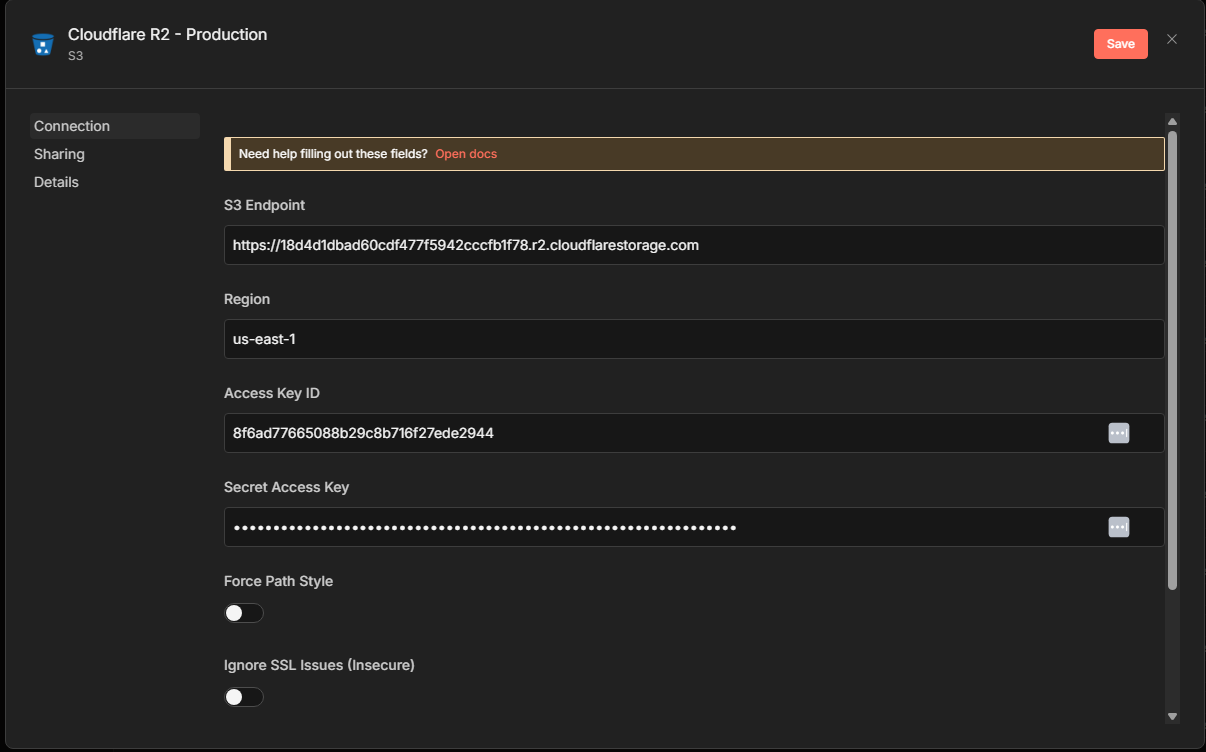
- Credential Name: Something clear like “Cloudflare R2 – Production”
- S3 Endpoint: Enable this toggle and enter:
https://<account-id>.r2.cloudflarestorage.com - Region: Enter
auto(this is R2-specific, tells the client to work with R2’s system) - Access Key ID: Paste from Step 3
- Secret Access Key: Paste from Step 3
- Force Path Style: Leave disabled
Click “Create”. n8n validates connection when you first use it.
Step 5: Build a Test Upload Workflow
Let’s build something practical—a workflow that downloads an image and uploads it to R2. This pattern works for AI image generation, screenshots, downloaded media, and more.
Copy my example JSON file below:
{
  "name": "Setup Cloudflade R2",
  "nodes": [
    {
      "parameters": {},
      "type": "n8n-nodes-base.manualTrigger",
      "typeVersion": 1,
      "position": [
        -448,
        -240
      ],
      "id": "a591c10b-028a-47c4-b4f1-2606a8007e3e",
      "name": "When clicking ‘Execute workflow’"
    },
    {
      "parameters": {
        "url": "https://picsum.photos/800/600",
        "options": {
          "response": {
            "response": {
              "responseFormat": "file"
            }
          }
        }
      },
      "type": "n8n-nodes-base.httpRequest",
      "typeVersion": 4.3,
      "position": [
        -240,
        -240
      ],
      "id": "b827504c-6331-4f19-9511-db5bedf99454",
      "name": "HTTP Request"
    },
    {
      "parameters": {
        "operation": "upload",
        "bucketName": "n8n-sevosmith",
        "fileName": "=images/test.jpg",
        "additionalFields": {
          "acl": "publicRead"
        }
      },
      "type": "n8n-nodes-base.s3",
      "typeVersion": 1,
      "position": [
        -32,
        -240
      ],
      "id": "e20a8145-368c-436d-b450-a5ca5f3a89a8",
      "name": "Upload a file",
      "credentials": {
        "s3": {
          "id": "oyCggGXvvPsDGYKx",
          "name": "Cloudflare R2 - Production"
        }
      }
    },
    {
      "parameters": {
        "assignments": {
          "assignments": [
            {
              "id": "ec3342af-715b-4404-a19f-bd6a2fdd7d35",
              "name": "publicUrl",
              "value": "=https://pub-bb1216ce43324c099486c281263e20e7.r2.dev/images/test.jpg",
              "type": "string"
            }
          ]
        },
        "options": {}
      },
      "type": "n8n-nodes-base.set",
      "typeVersion": 3.4,
      "position": [
        176,
        -240
      ],
      "id": "b21194c0-596a-44b7-a87d-1ee8c9483578",
      "name": "Get Image URL"
    }
  ],
  "pinData": {},
  "connections": {
    "When clicking ‘Execute workflow’": {
      "main": [
        [
          {
            "node": "HTTP Request",
            "type": "main",
            "index": 0
          }
        ]
      ]
    },
    "HTTP Request": {
      "main": [
        [
          {
            "node": "Upload a file",
            "type": "main",
            "index": 0
          }
        ]
      ]
    },
    "Upload a file": {
      "main": [
        [
          {
            "node": "Get Image URL",
            "type": "main",
            "index": 0
          }
        ]
      ]
    }
  },
  "active": false,
  "settings": {
    "executionOrder": "v1",
    "availableInMCP": false
  },
  "versionId": "ffbe42e6-61f0-413e-beee-11bf330857c8",
  "meta": {
    "templateCredsSetupCompleted": true,
    "instanceId": "ecafe3612490e54547497b912a5ff8791e237be1baa22093b760bb94e6a28be6"
  },
  "id": "Nis1ZuywZkWvRY0i",
  "tags": []
}Or Create a new workflow manually in n8n and add these nodes:
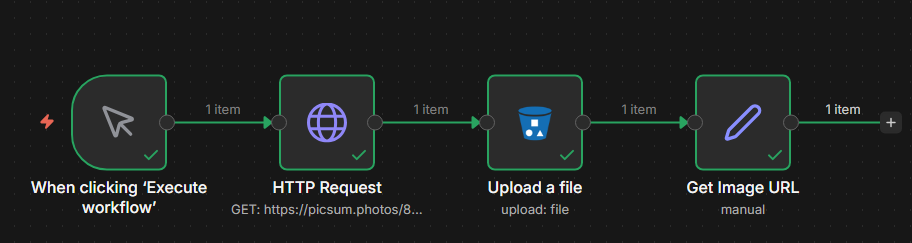
Node 1: Manual Trigger
- Add a “Manual Trigger” node to your canvas
- No configuration needed—this simply starts the workflow when you click “Execute Workflow”
Node 2: HTTP Request (Get Image)
This fetches an image to upload:
- Add an “HTTP Request” node to generates a random test image
- Connect it to the Manual Trigger
- Configure:
- Method: GET
- URL:
https://picsum.photos/800/600 - Response Format: File
- Binary Property:
data
This downloads the image and stores it as binary data for the next node.
Node 3: S3 (Upload to R2)
This is where the upload happens:
- Add an “S3” node
- Connect it to the HTTP Request node
- Configure:
- Credential to connect with: Select your R2 credentials from Step 4
- Operation: Upload
- Bucket Name: Your bucket name (e.g.,
n8n-sevosmith) - File Name: Use simple name images/test.jpg
- Binary Data: Toggle ON
- Binary Property Name:
data(must match the HTTP Request node)
Click “Add Field” and configure Additional Fields:
- ACL:
public-read(makes the file publicly accessible)
Node 4: Set (Format Output URL)
Get the public URL to use elsewhere:
- Add a “Set” node
- Connect it to the S3 node
- Configure:
- Mode: Manual Mapping
- Click “Add Field”
- Name:
publicUrl - Value:
https://pub-<your-hash>.r2.dev/images/test.jpg

Example:
https://pub-bb1216ce43324c099486c281263e20e7.r2.dev/images/test.jpgKeep Costs Down
R2’s free tier is generous, but optimization matters for scale.
Free tier:
- 10 GB storage/month
- 1M Class A operations/month (writes, lists)
- 10M Class B operations/month (reads)
- Unlimited egress
Storage optimization:
Use efficient formats. WebP images are 25-35% smaller than JPEG with similar quality. For AI-generated images, this significantly extends free tier.
Organize with prefixes from day one. R2 doesn’t have true folders (it’s object storage), but using /images/2024/01/ makes lifecycle management easier.
Operation optimization:
Check if files exist before uploading. Simple workflow modification saves thousands of Class A operations:
- Use S3 “Get Object” to check existence
- If exists and unchanged, skip upload
- Only upload when necessary
Monitor usage:
Check R2 dashboard under “Usage” regularly. Set up Cloudflare usage alerts to notify before hitting free tier limits.
Paid pricing:
If you exceed free tier, R2 is still competitive: $0.015/GB/month storage. Zero egress means major savings vs AWS S3 for high-traffic applications.
Security Best Practices
Production automation needs solid security.
Credential management:
Never hardcode credentials in workflow nodes. Always use n8n’s credential manager (encrypts stored credentials). This prevents exposure when exporting workflows.
For self-hosted n8n, use environment variables for extra security. Store R2 credentials as env vars, reference in n8n.
Separate tokens:
Create different API tokens for different purposes:
- Development: Limited to test buckets
- Production: Production buckets only
- CI/CD: Separate for automated deployments
Compromised dev credentials can’t affect production.
Least privilege:
Grant minimum necessary permissions. Read-only workflow? Create read-only token. Upload to specific folders? Configure bucket-level restrictions.
Rotate credentials:
Rotate R2 API credentials every 90 days for production:
- Generate new token in Cloudflare
- Create new credential in n8n
- Update workflows
- Test thoroughly
- Revoke old token
Bucket versioning:
Enable versioning for critical files (in bucket settings). Keeps previous versions when overwritten, protecting against accidental deletions.
Monitor access:
Watch access patterns in Cloudflare analytics. Unusual upload spikes or patterns indicate compromised credentials or misconfigured workflows.
Presigned URLs:
For semi-private files, use presigned URLs. Configure S3 node to generate time-limited URLs (1 hour expiration). Perfect for temporary download links via email.
What You’ve Built
You now have production-ready R2 integration with n8n:
- R2 bucket configured for automation
- Secure API credentials with proper scoping
- Working n8n workflow that uploads files
- Public URLs for generated content
- Security practices for production use
Next steps:
Integrate into existing workflows: Look for anywhere you store files locally or use expensive cloud storage. Those are prime R2migration candidates.
Set up custom domains: Replace pub-abc123.r2.dev with cdn.yourdomain.com for professional URLs and brand consistency.
Try Image Transformations: Cloudflare offers on-the-fly image resizing and format conversion from R2 URLs. Perfect for responsive design without pre-generating sizes.
Implement backups: Even if R2 is primarily for images, automated workflow backups provide valuable insurance.
With R2 and n8n together, you’ve built scalable, cost-effective infrastructure that grows from hobby projects to enterprise scale without the traditional cloud storage bill. Zero egress fees + S3 compatibility = best of both worlds.
Troubleshooting Common Issues
Here are the issues I have hit (and fixed) across dozens of R2 + n8n deployments:
“Access Denied” or 403 Errors
Cause: Your API token does not have the right permissions, or it is scoped to a different bucket.
Fix: Go to Cloudflare > R2 > Manage R2 API Tokens. Verify the token has Object Read & Write permission and is applied to the correct bucket (or “All buckets”). Regenerate the token if needed — you cannot view the secret after creation.
“Bucket Not Found” or NoSuchBucket
Cause: Typo in the bucket name, or the endpoint URL does not match your account ID.
Fix: Bucket names are case-sensitive and must be lowercase. Double-check your S3 endpoint in n8n — it should be https://<ACCOUNT_ID>.r2.cloudflarestorage.com. Find your account ID in the Cloudflare dashboard URL or R2 overview page.
“SignatureDoesNotMatch” Error
Cause: The Access Key ID or Secret Access Key was copied with extra whitespace or wrong characters.
Fix: Delete and re-paste both keys in n8n credentials. Watch for trailing spaces — they are invisible but break authentication. If you have lost the secret, generate a new token.
Files Upload but URLs Return 404
Cause: Public access is not enabled on the bucket, or you are using the wrong URL format.
Fix: Enable the r2.dev subdomain in bucket settings (Settings > Public Access > R2.dev subdomain). Public URLs use the format https://pub-<hash>.r2.dev/filename.jpg, not the S3 endpoint URL.
n8n S3 Node Shows “Region” Field
Cause: The AWS S3 node expects a region, but R2 does not use regions the same way.
Fix: Set the region to auto in the n8n S3 credentials. This tells the S3-compatible client to skip region-specific signing, which is exactly what R2 needs.
Frequently Asked Questions
Does R2 have file size limits?
Individual objects can be up to 5 TB. For uploads larger than 5 GB, use multipart upload (the n8n S3 node handles this automatically for large files). For typical n8n use cases — images, PDFs, JSON exports — you will never hit these limits.
Can I use R2 with n8n Cloud, or only self-hosted?
Both. R2 works with any n8n instance — cloud or self-hosted. The connection uses standard S3 credentials over HTTPS, so there are no network restrictions. Just add your R2 credentials in n8n’s AWS S3 credential settings.
Is R2 really free?
The free tier includes 10 GB storage, 10 million Class A operations (writes), and 1 million Class B operations (reads) per month. Egress is always free regardless of tier. Most n8n automation projects stay well within the free tier for months.
Do I need to set up CORS for R2?
Only if your frontend JavaScript directly requests files from the R2 bucket. For n8n workflows that upload files and serve public URLs, CORS is not needed. If you do need it, configure CORS rules in Bucket Settings > CORS Policy with your allowed origins.
Can I use a custom domain instead of r2.dev URLs?
Yes. Go to Bucket Settings > Custom Domains and add a subdomain like cdn.yourdomain.com. The domain must be on Cloudflare (proxied through their network). This gives you branded URLs and full Cloudflare caching — recommended for production.
Need help setting up R2 with your n8n workflows?
I offer done-for-you n8n automation setup — including cloud storage, API integrations, and production deployment.
Get Setup Help →Related n8n Integration Guides
If you’re building n8n workflows that interact with WordPress or SEO tools, these guides are useful next steps: WordPress Application Passwords for n8n and updating Rank Math SEO via n8n REST API.